
This site is a work in progress and will continue to change as our software evolves. Every effort will be made to publish updates promptly as they are released. Please email any questions or comments to pburgio@foscd.com.
PM and Client Admin #

A user’s navigation bar may appear different from the one pictured based on the security level assigned by the system administrator and the organization’s subscription agreement.
- Introduction
- PM Options
- Upload QA Spreadsheet
- Modeled Aggregate Tool
- Batch Building Reports
- Batch Site Reports
- Batch Report Status
- KPI Room Type Capacities
- What is a KPI Template?
- Offline Data Import
- Client Admin Options
- Manage Portfolio Client Fields
- Manage Site Client Fields
- Manage Building Client Fields
- Manage Location Client Fields
- Manage Assessment Client Fields
- Manage Client Settings
- Client Admin File Storage
- Lifecycle Management (Portfolio Aging)
- Manage Client Departments
- Manage Pre-Shared Key (PSK)
- TCO Mapping
- Assessment Repricing
Introduction #
The role and security level your organization has assigned to you within the FOScore® Suite will determine which of the Admin functions and tools you have access to. The top of the Admin module will display that security level and the client you are actively working in. The module contains the following groups of options: PM Options (for project managers), Client Admin Options, Administrator Options (for FOScore® personnel), Administrator KPI Options, Administrator IDP Options, and Estimating Options. A separate menu exists for the Estimating module, which is accessed by clicking the Estimating Admin Menu link at the lower right of the screen.
PM Options #
PM Options are available to project managers.
Upload QA Spreadsheet #
Users can upload QA spreadsheets to the software.
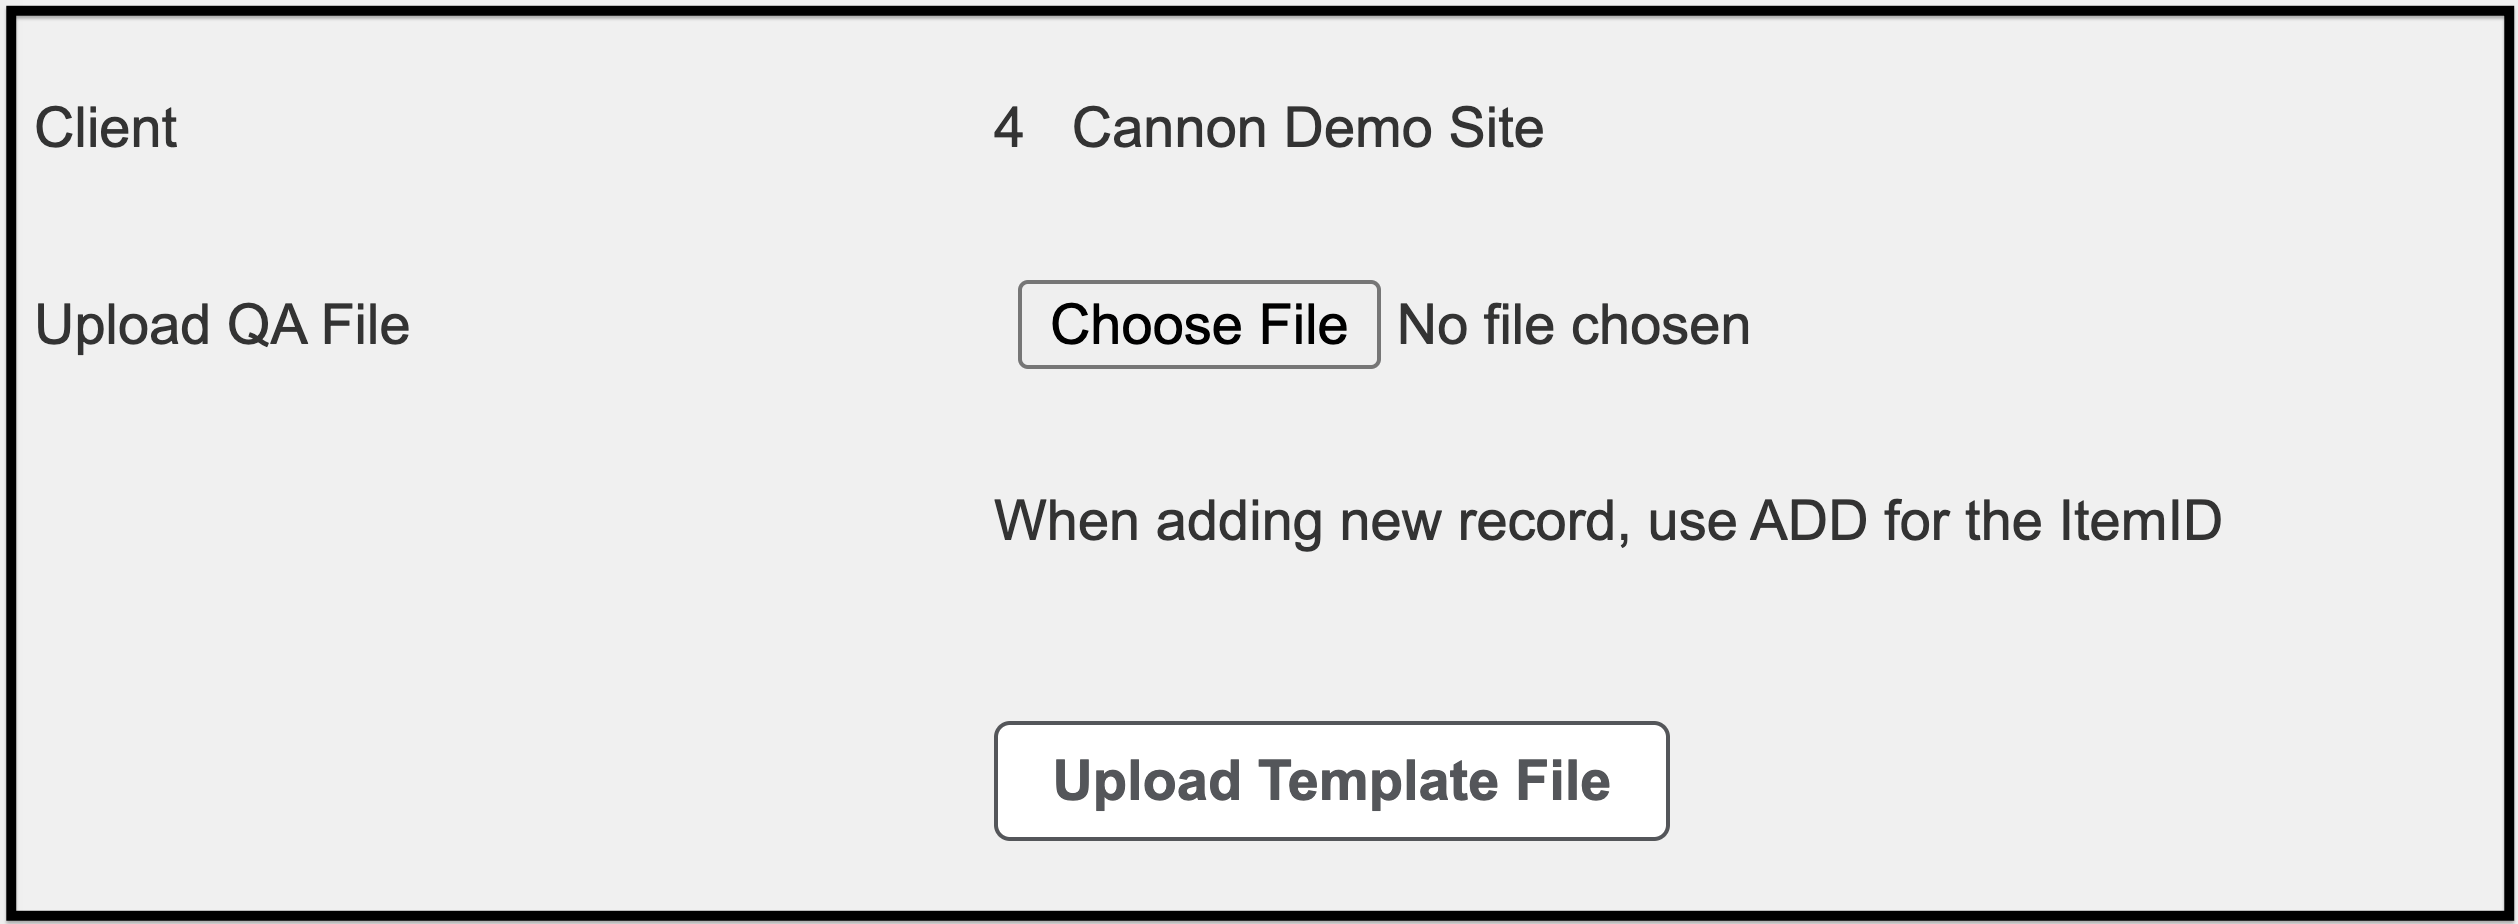
To upload a QA Spreadsheet:
- Select Choose File
- After selecting Choose File, your computer’s file explorer will open.
- Find the file you’d like to upload and select Open.
- Once the file has loaded into the software, select Upload Template File.
Modeled Aggregate Tool #
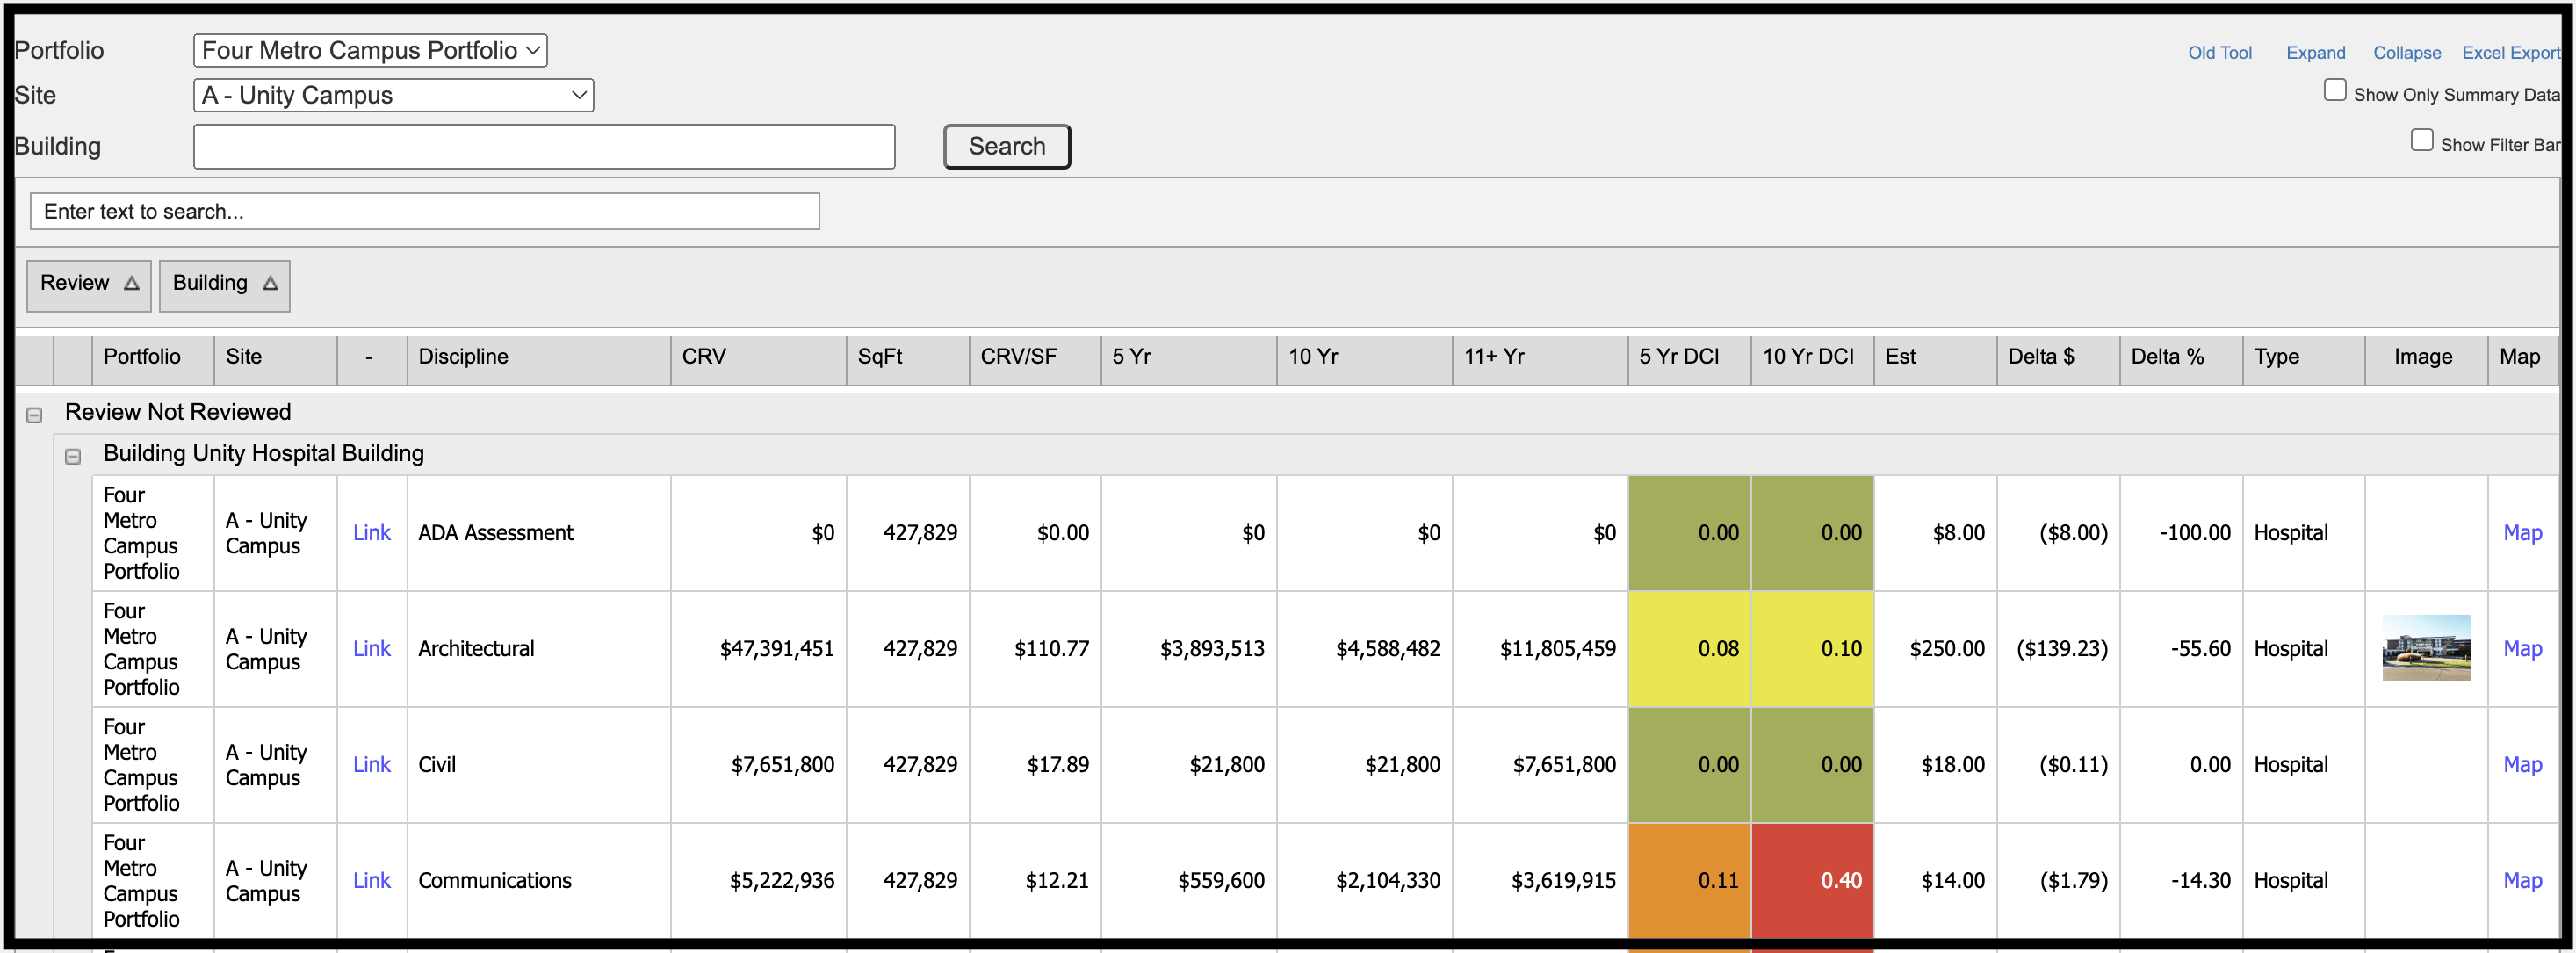
In the Modeled Aggregate Tool, users can:
- View all buildings’ DCI breakdown(s)
- Select the site name you’d like to view the DCI breakdown of
- Once you’ve made your selection, select Search
- The software will then generate a DCI breakdown for the buildings selected.


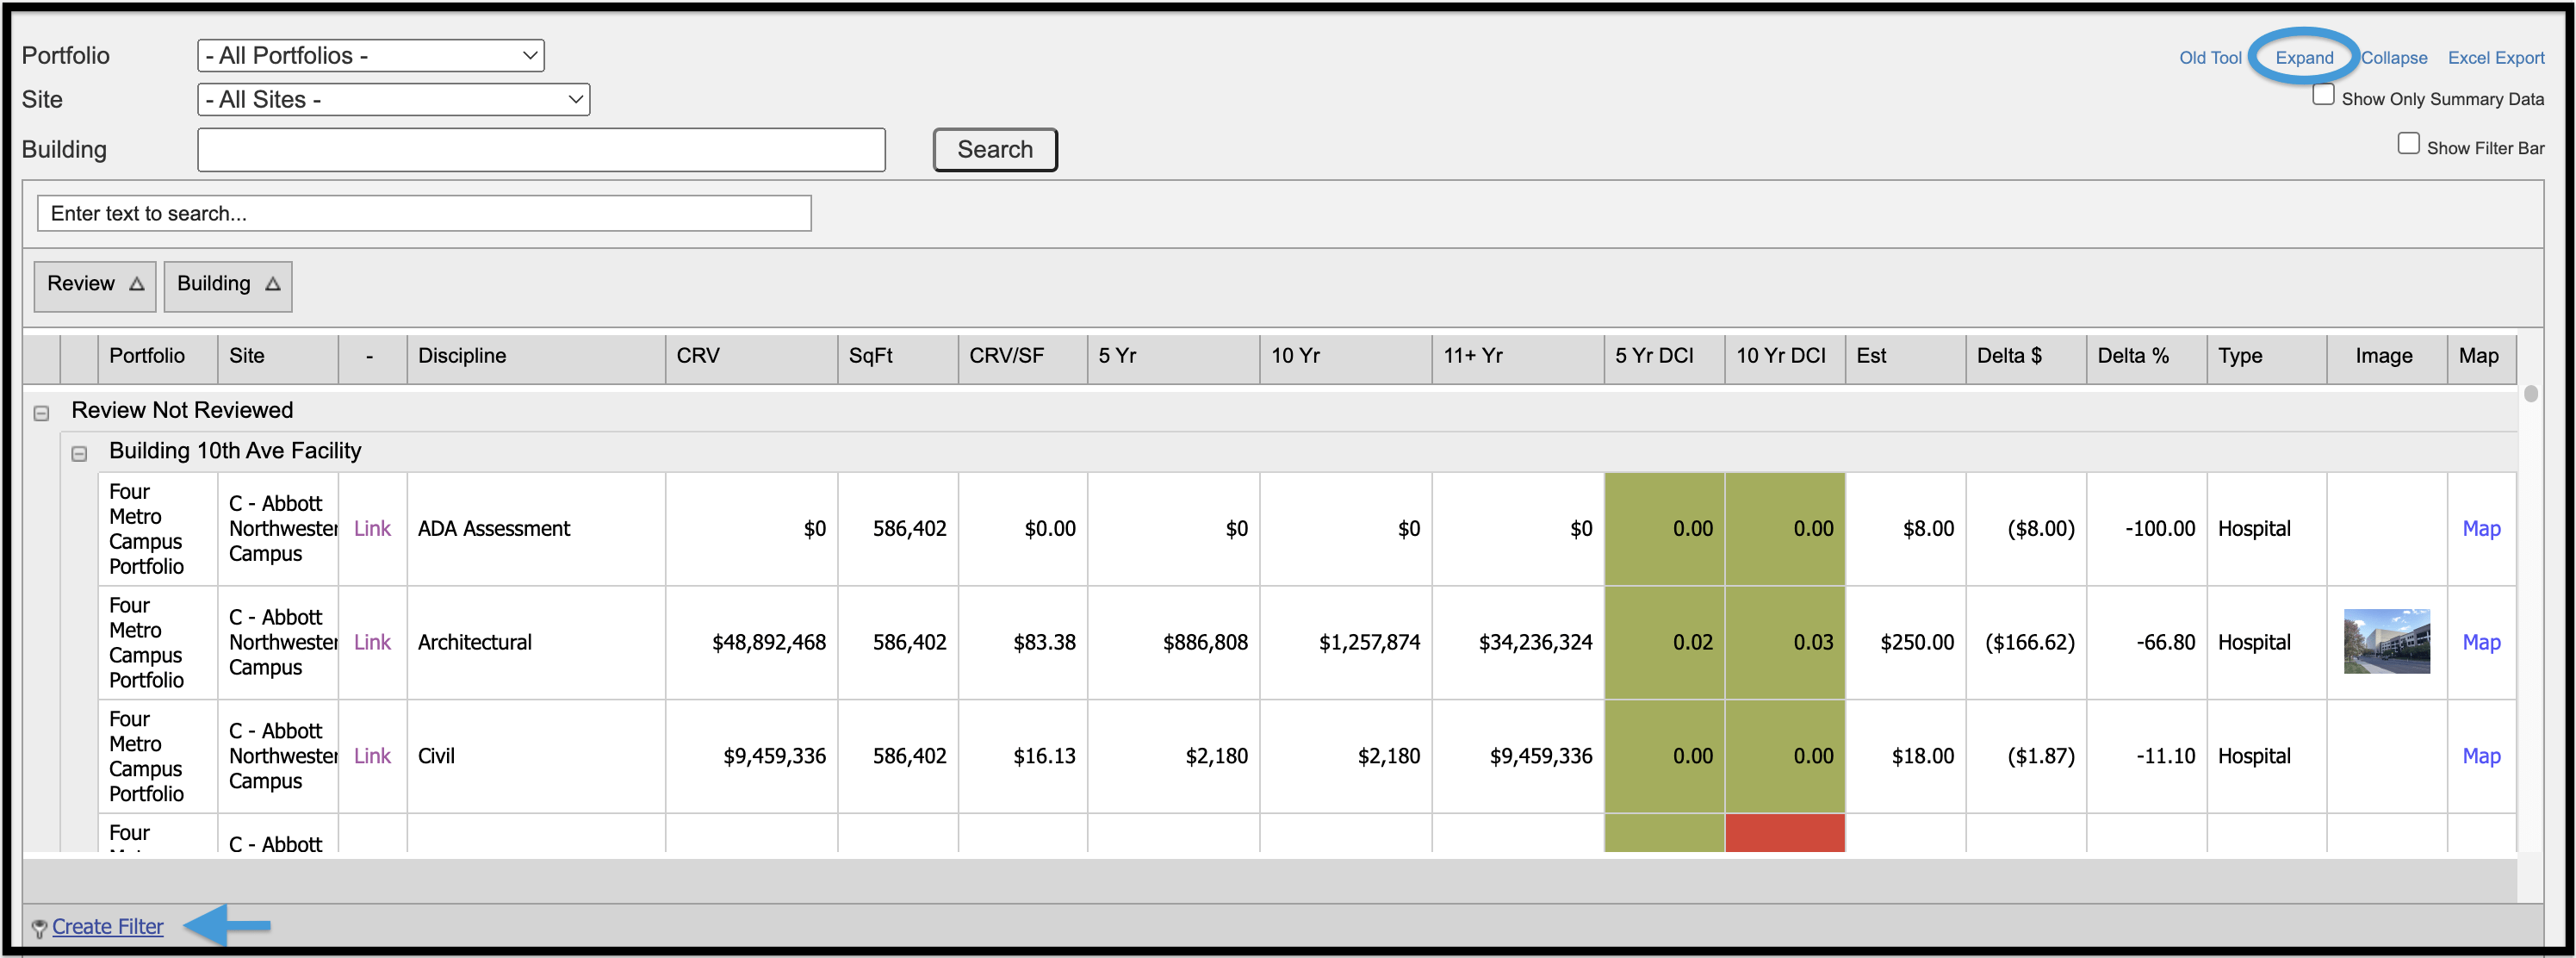
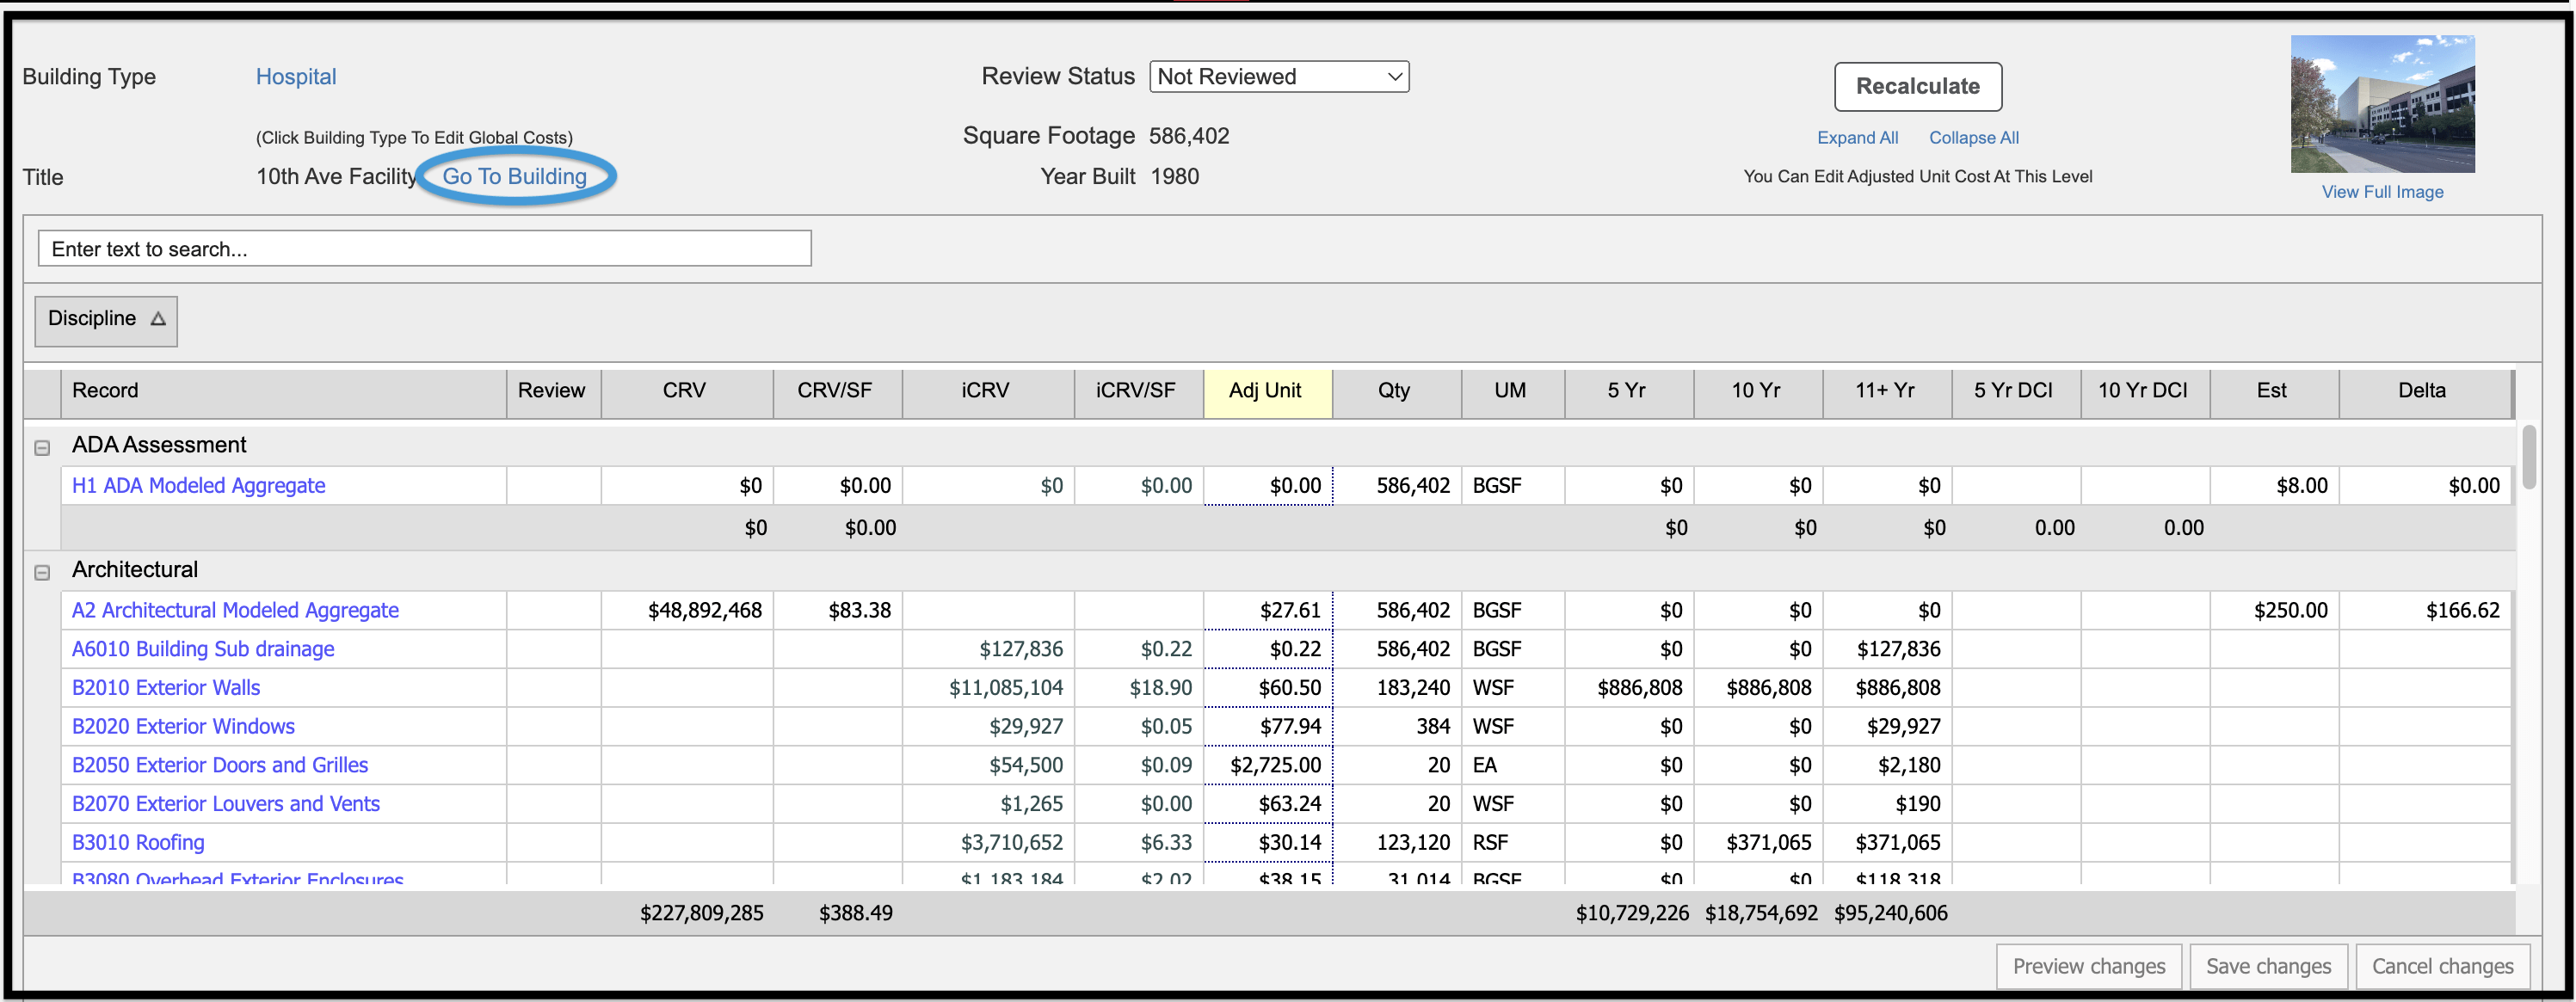
Click Expand to view the data by discipline, including a link to assessment records.




Batch Building Reports #
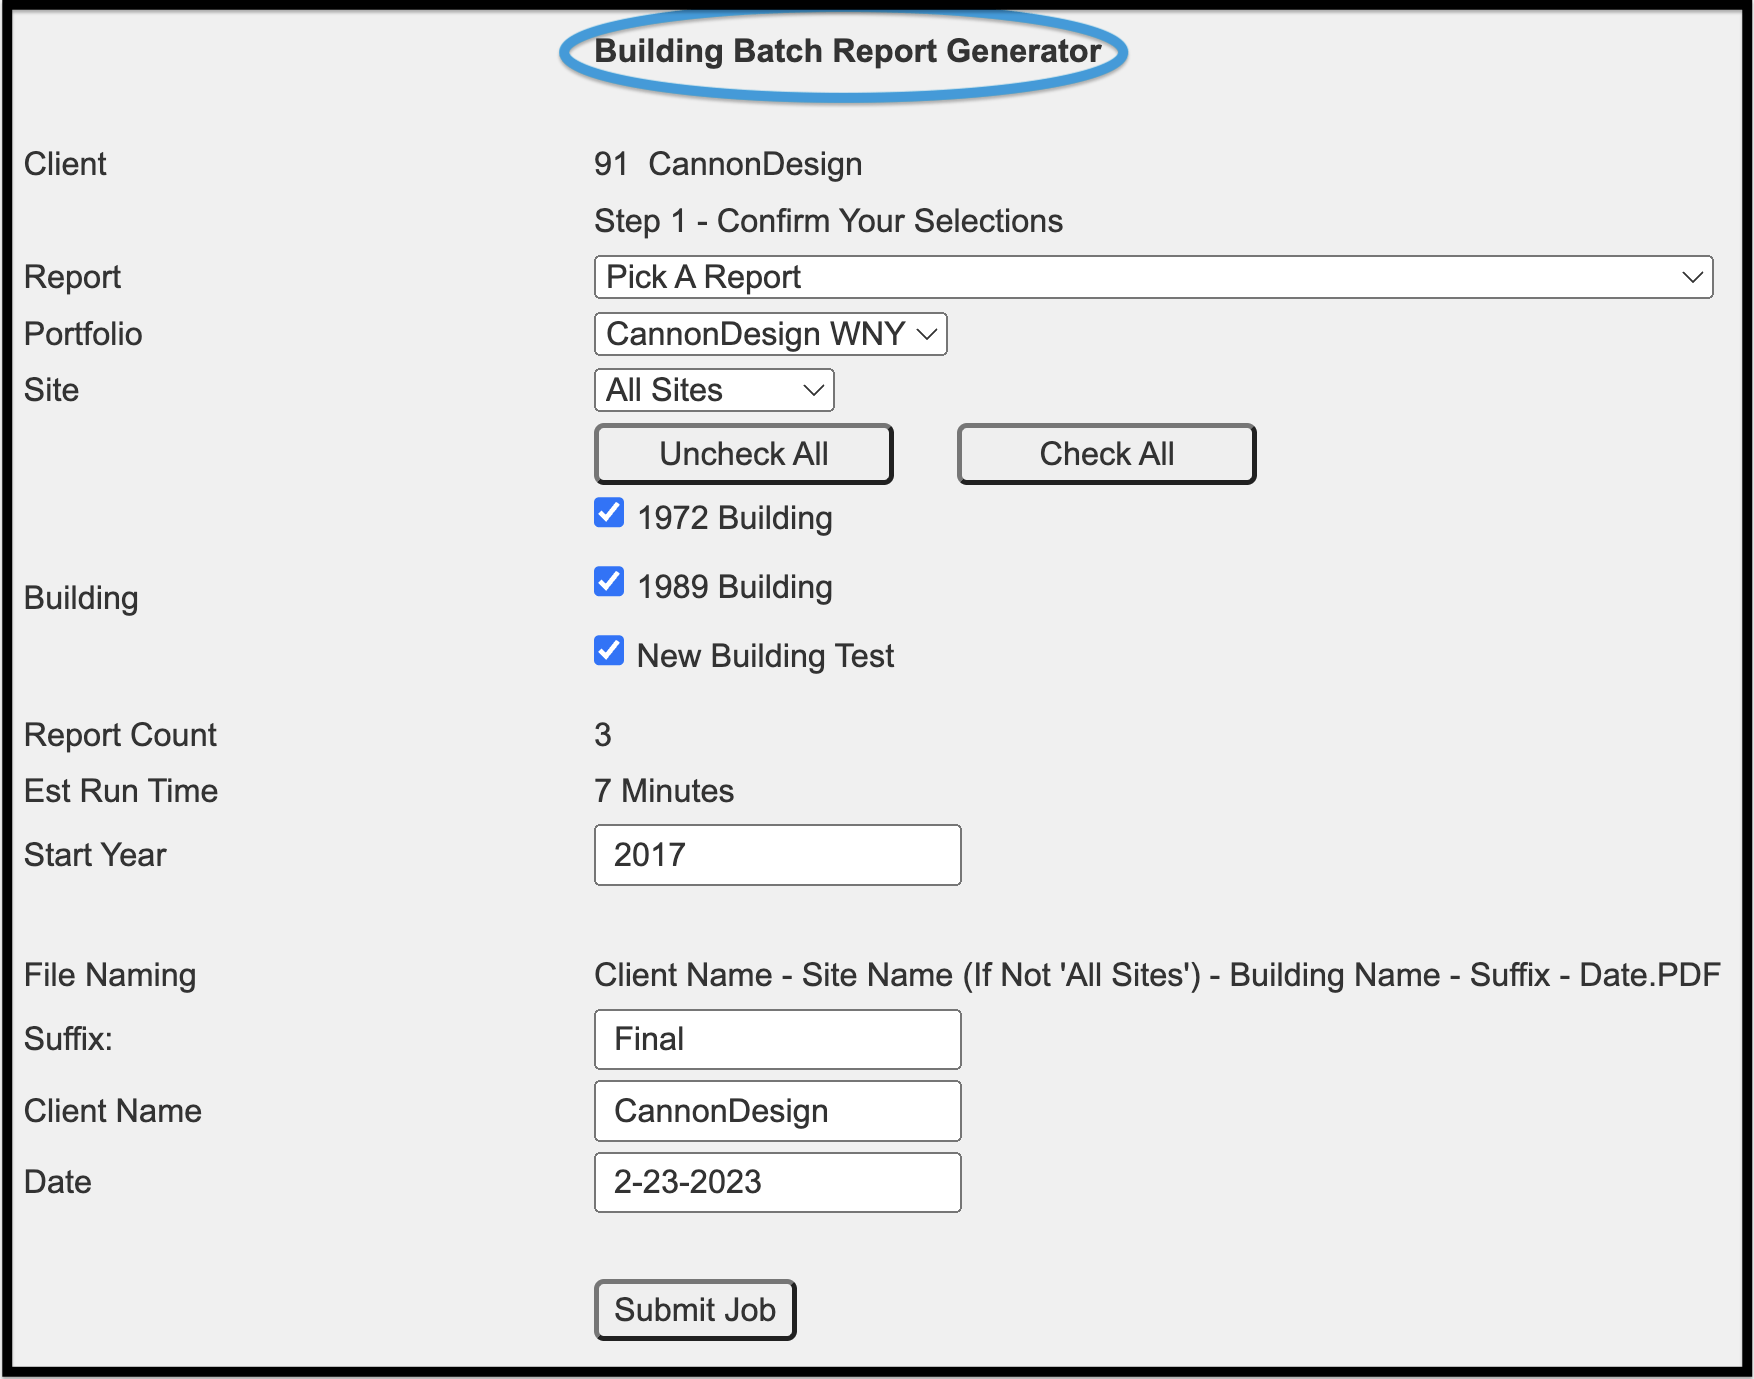
Use the Batch Report Generator to generate a report for multiple buildings at once. To create a Batch Building Report:
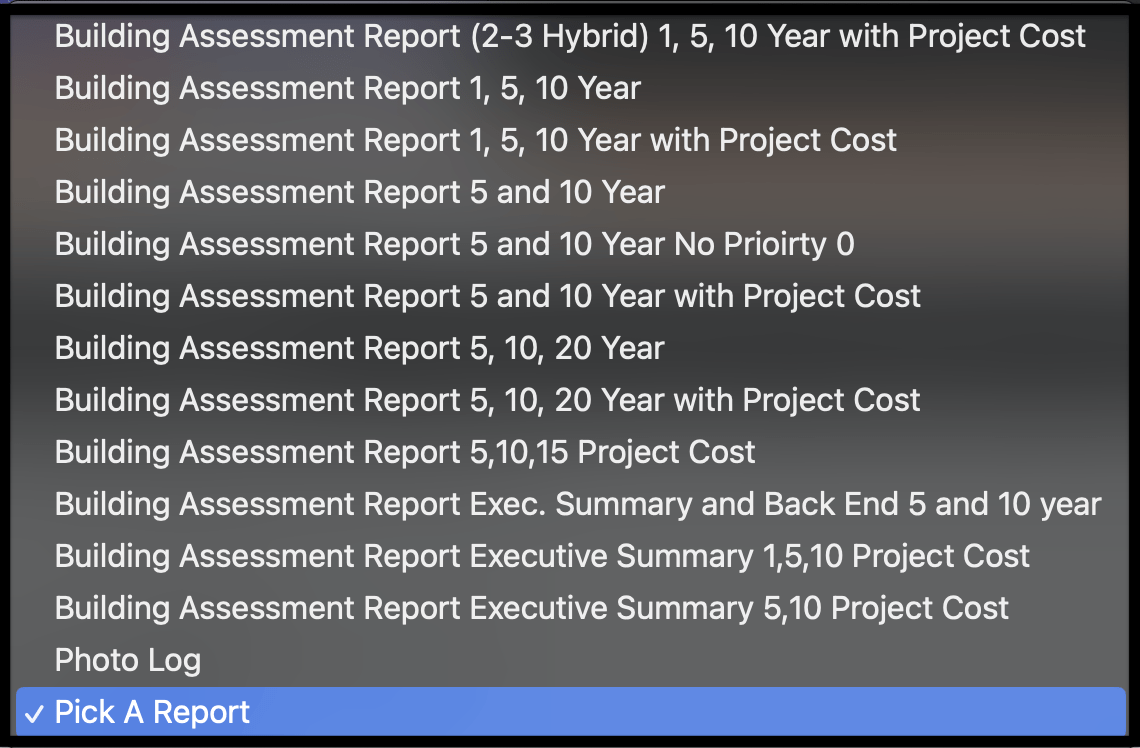
- Begin by selecting the report you’d like to run.
- Next, select the Portfolio and Site to be included in the report.
- The buildings will be listed in a checklist layout, check the box to the left of the building name that is to be included in the report.
- To deselect all buildings, click Uncheck All. To select all buildings, click Check All.
- Enter the Start Year, Suffix, and Client Name.
- The Client Name and Suffix you enter will be included in the report title.
- Report Count, est. Run Time, File Naming are read-only information fields.
- The Date will automatically populate with the date the Batch Report is run.
- After all the information is input into the generator, click Submit Job.
Batch Site Reports #
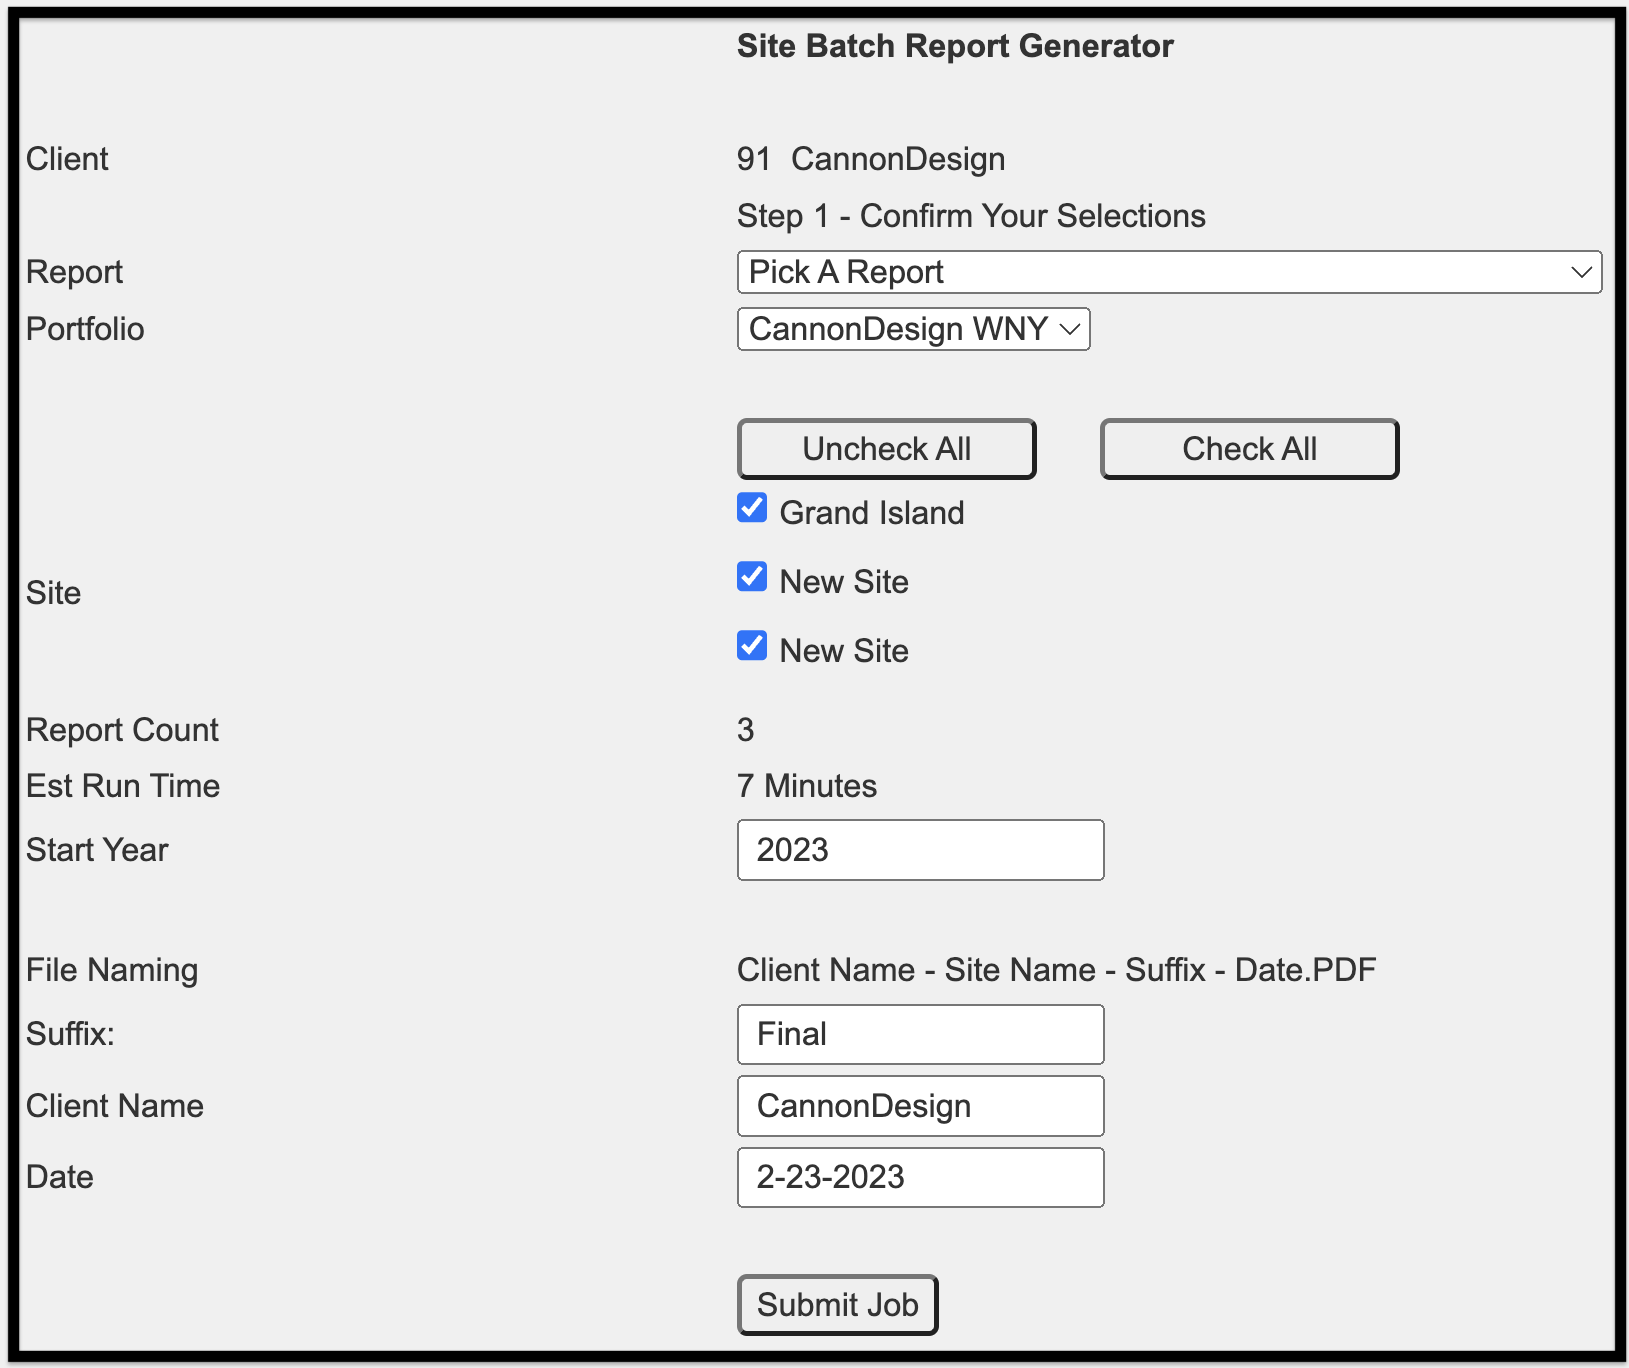
Use the Site Batch Report Generator to generate a report for multiple buildings at once. To create a Batch Site Report:
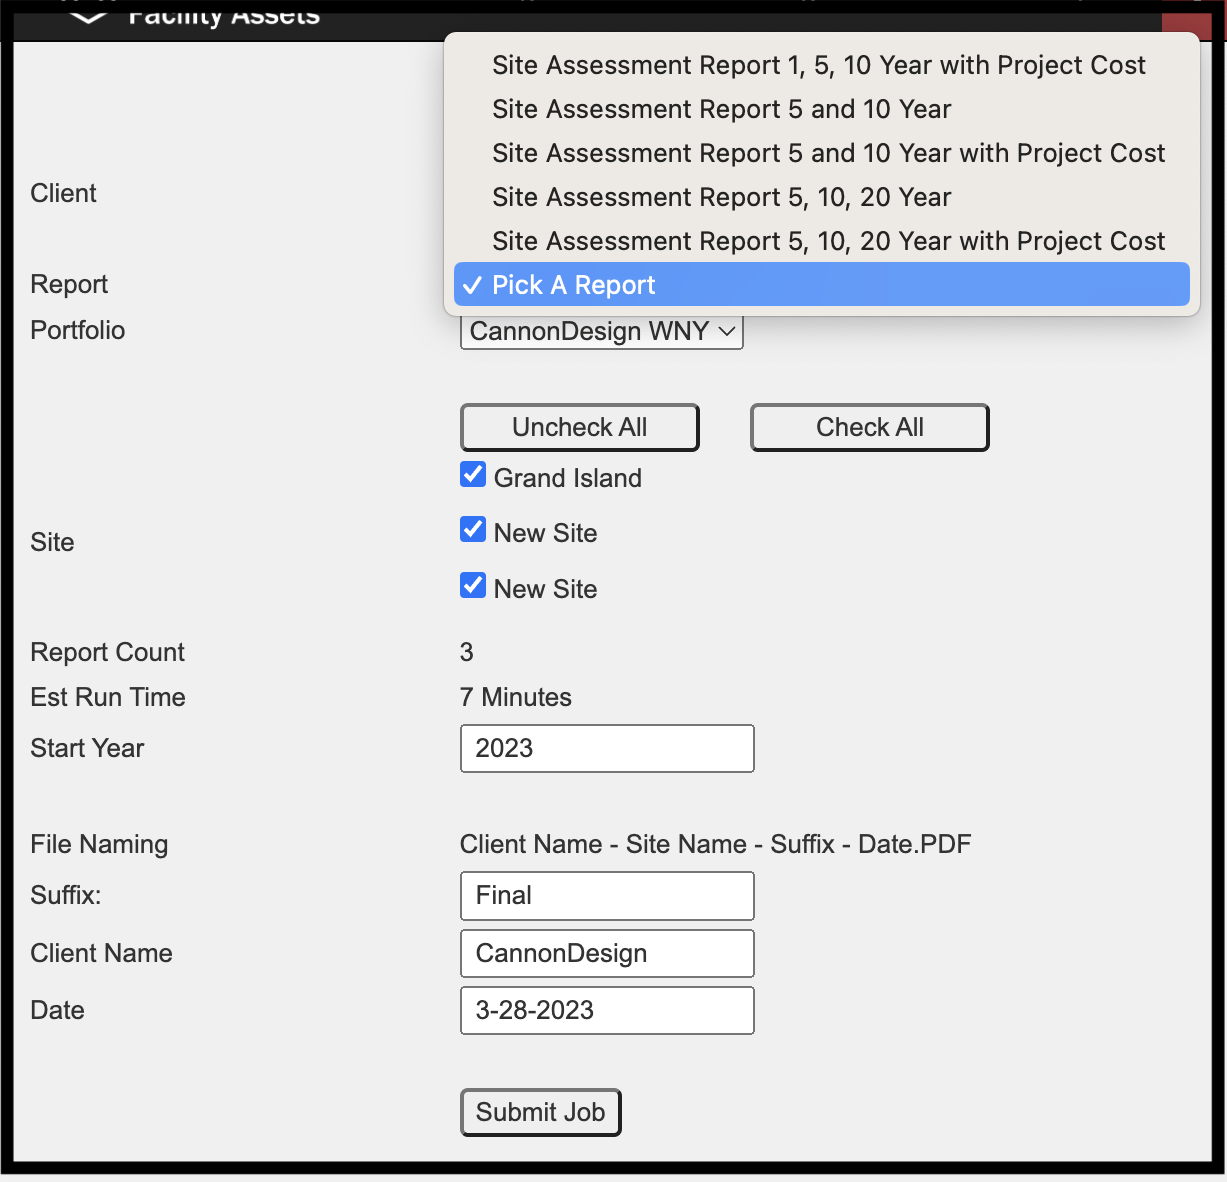
- Begin by selecting the report you’d like to run.
- Next, select the Portfolio and Site to be included in the report.
- The sites will be listed in a checklist layout, check the box to the left of the site(s) to be included in the report.
- To deselect all sites, click Uncheck All. To select all sites, click Check All.
- Enter the Start Year, Suffix, and Client Name.
- Report Count, est. Run Time and file Naming are read-only information fields.
- The Date will automatically populate with the date the Batch Report is run.
- After all the information is input into the generator, click Submit Job.
Batch Report Status #
The Batch Report Status feature consolidates all batch reports run.
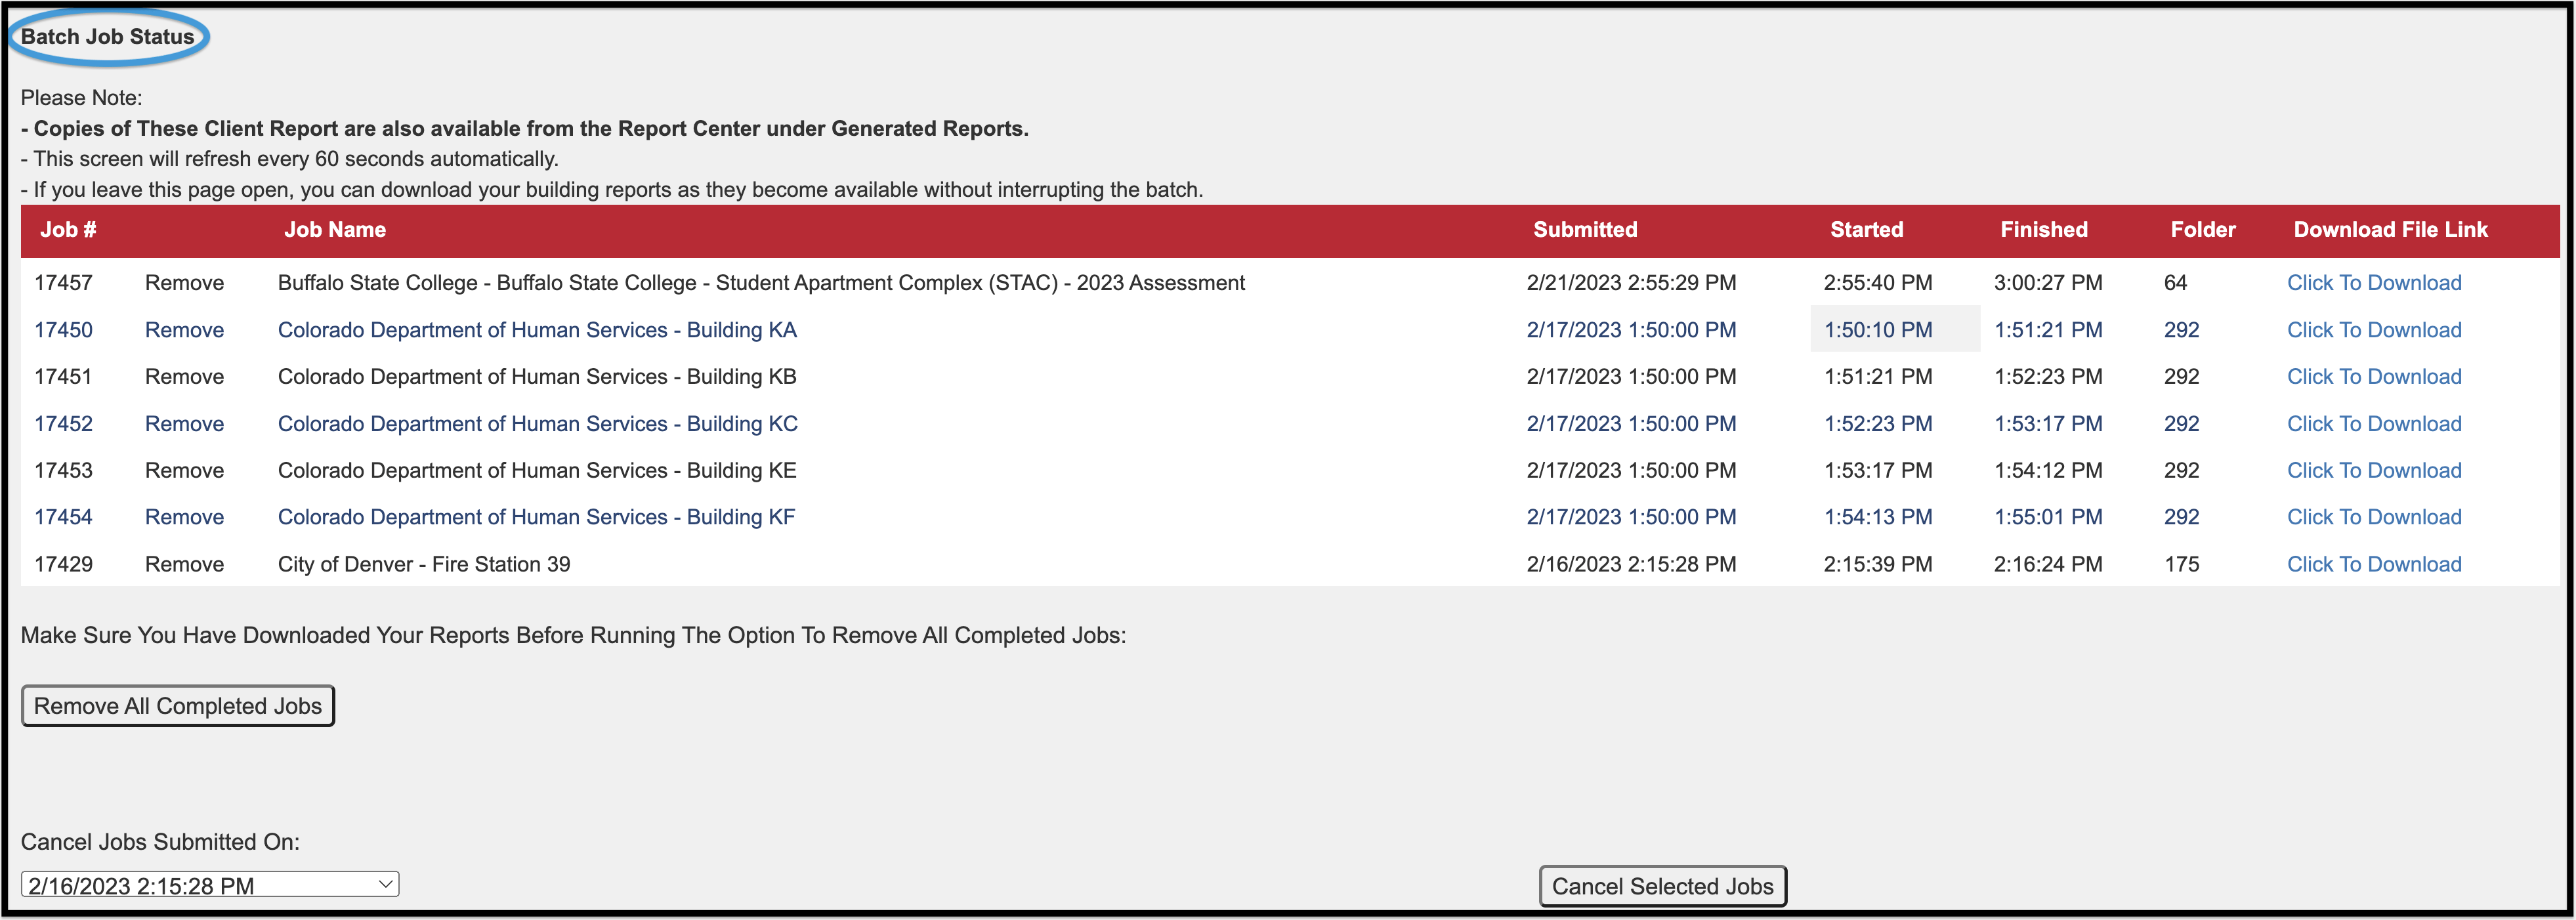
- The reports will be displayed in the Batch Job Status grid with the following information:
- Job #
- Job Name
- Submitted (date/time)
- Started (time)
- Finished (time)
- Folder
- Download File Link
- To remove a Batch Report, select Remove to the left of the Job Name.
- To download a report, select Click to Download to the right of the Folder number.
- Your downloaded report will automatically appear in a new window.
- To remove all completed jobs, select Remove All Completed Jobs on the bottom left of the grid.
- To cancel specific jobs, select the date and time the batch was submitted and click Cancel Selected Jobs.
- Use the cancel option with caution. It will remove all jobs which have not been started in each batch.
KPI Room Type Capacities #

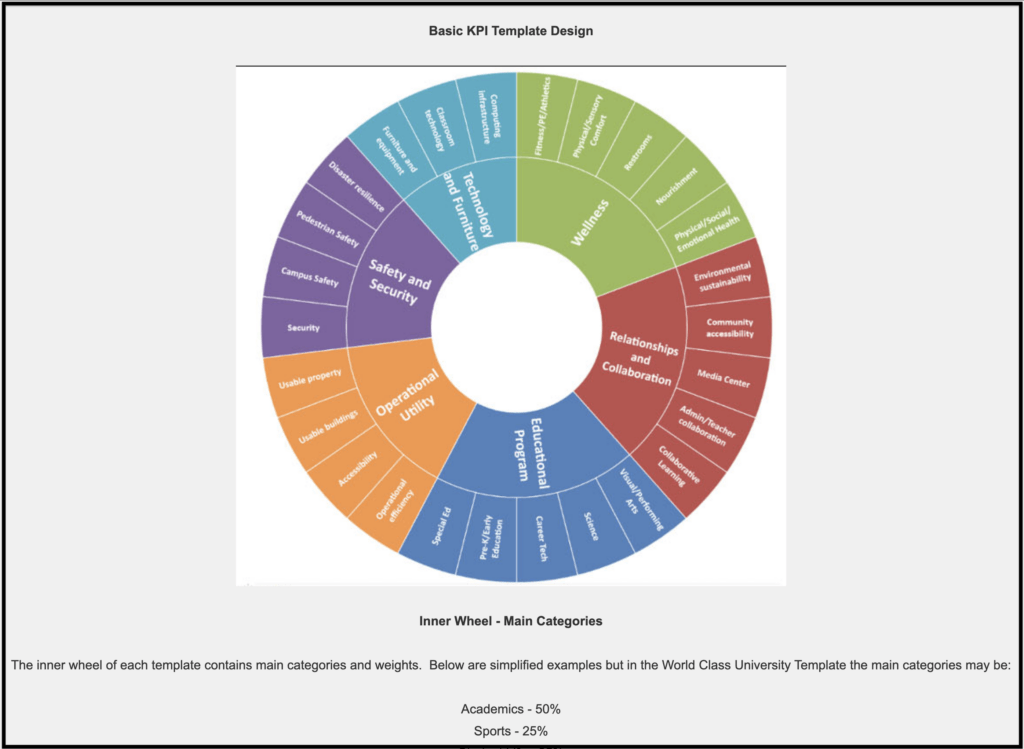
What is a KPI Template? #
Offline Data Import #
This feature is used to transfer records from the FOS Field Assessment Tool app on your mobile device to your system records. To add records to your FOScore® account, click on Offline Data Import.
Select the records (either all or individually) you would like to bring into the system. They will then be priced and turned into assessment records.

Below is an image of the assessment records in the Assets module after they have been uploaded from the app.

Client Admin Options #
Available to clients with administrative capabilities.
Manage Portfolio Client Fields #
Clients can manage and create new Portfolio Client Fields.

- Create a New Client Field by selecting Create New Field in the top right corner.
- The new field will automatically populate on the page.
- To edit the new field, click Edit to the left of the Field ID.
- You will then be able to edit the Field Name.
- To save, click Update.
- To cancel, click Cancel.
- To delete a Field, click Delete on the right of the Field.

Manage Site Client Fields #
Clients can create and manage new Site Client Fields.
Follow the steps from Manage Portfolio Client Fields to create and manage new Site Client Fields.

Manage Building Client Fields #
Clients can create and manage new Building Client Fields.
Follow the steps from Manage Portfolio Client Fields to create and manage new Building Client Fields.

Manage Location Client Fields #
Clients can create and manage new Location Client Fields.
Follow the steps from Manage Portfolio Client Fields to create and manage new Location Client Fields.
Manage Assessment Client Fields #
Clients can create and manage new Assessment Client Fields.

Follow the steps from Manage Portfolio Client Fields to create and manage new Assessment Client Fields.

Manage Client Settings #
This function enables you to update color schemes, select additional fields, set password rules, and view the users assigned to a client. The Users tab displays all registered users with their Last Name, First Name, Email Address, and Client Role. Additionally, this link is where you will find tabs for Security settings, TCO Module Defaults, TCO Building Type Defaults, and Advanced settings including the client’s Pricing Stability selection.
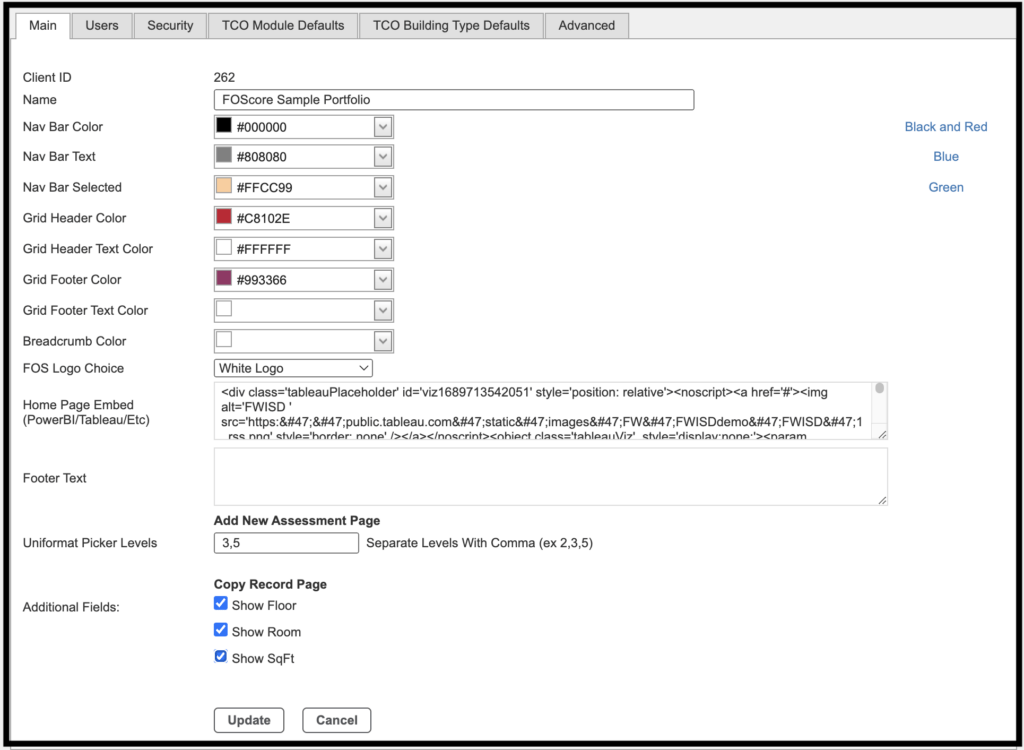
Users #
To access a grid listing all FOScore® registered users associated with a client, and their assigned client role, click on the Users tab.

Security #
Set client-specific password rules in the Security tab.
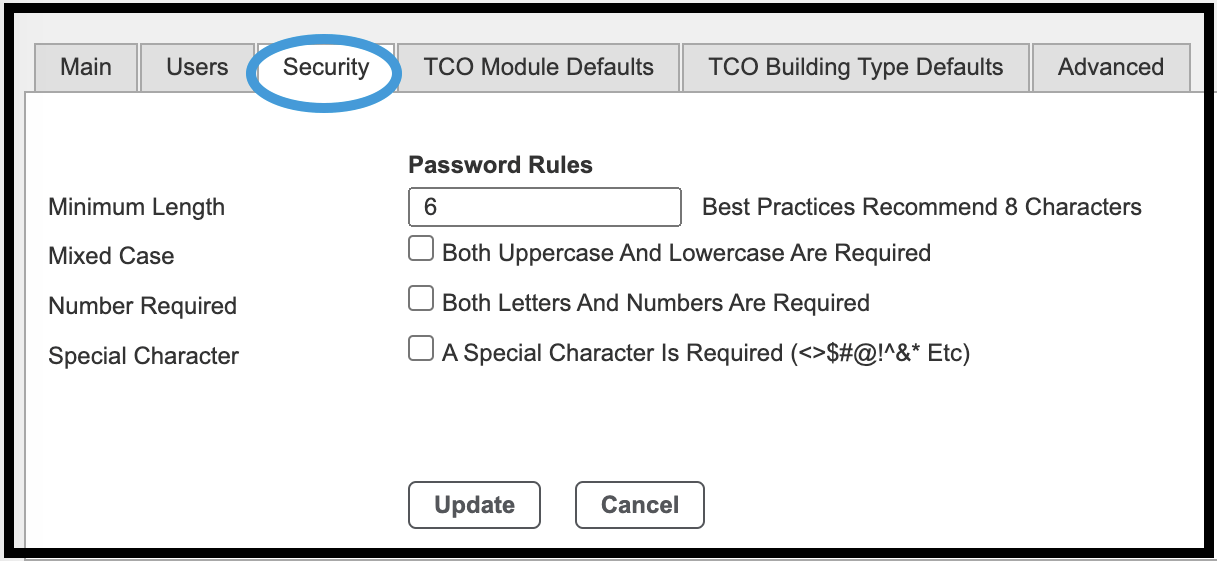
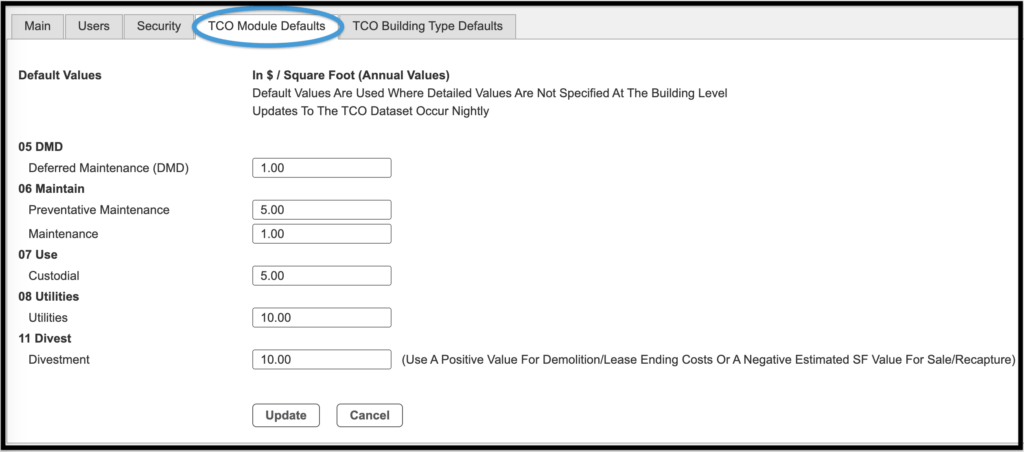
TCO Module Defaults #
The TCO Module Defaults tab provides the option of setting default values for the module. These are used where values are not specified at the Portfolio/Site/Building Type.
TCO Building Type Defaults #
The TCO Building Type Defaults tab provides an option to set values in a grid displaying building type and TCO item.
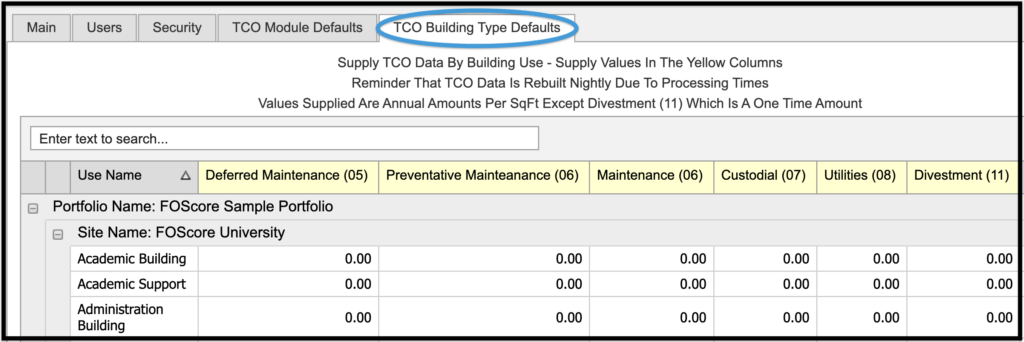
On this page, you will supply TCO data by building use. Values will be entered in the columns with yellow headers. Values supplied are annual amounts per square foot, except for divestment (11) which is a one-time amount per square foot. If you have more than one portfolio, the building type could have different costs assigned. For example, a client with multiple portfolios could have different costs assigned to the Academic Building type in each portfolio.
Client Admin File Storage #
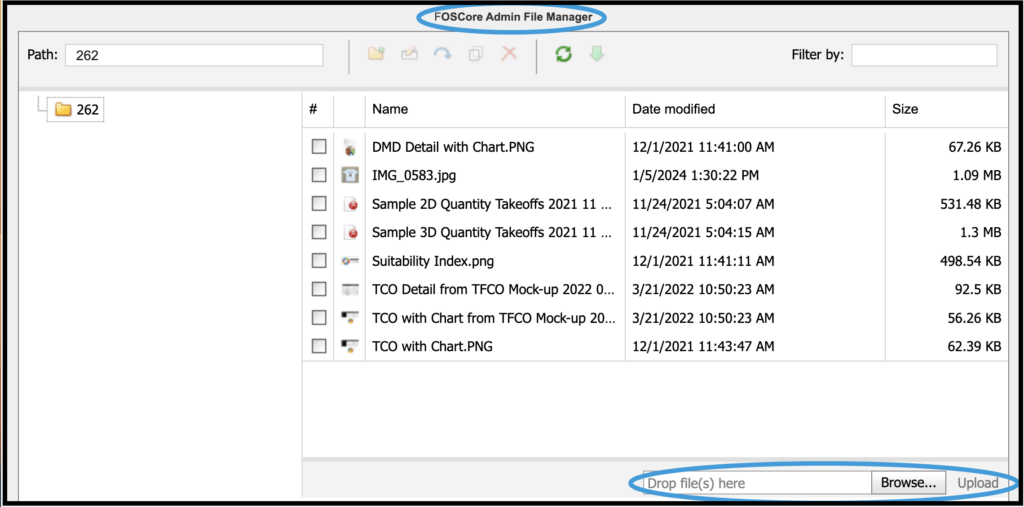
In this area, you can manage files within your account. Use the Browse and Drop features on the lower left to locate files on your computer and add them to your system files. Click Upload to save.
Lifecycle Management (Portfolio Aging) #
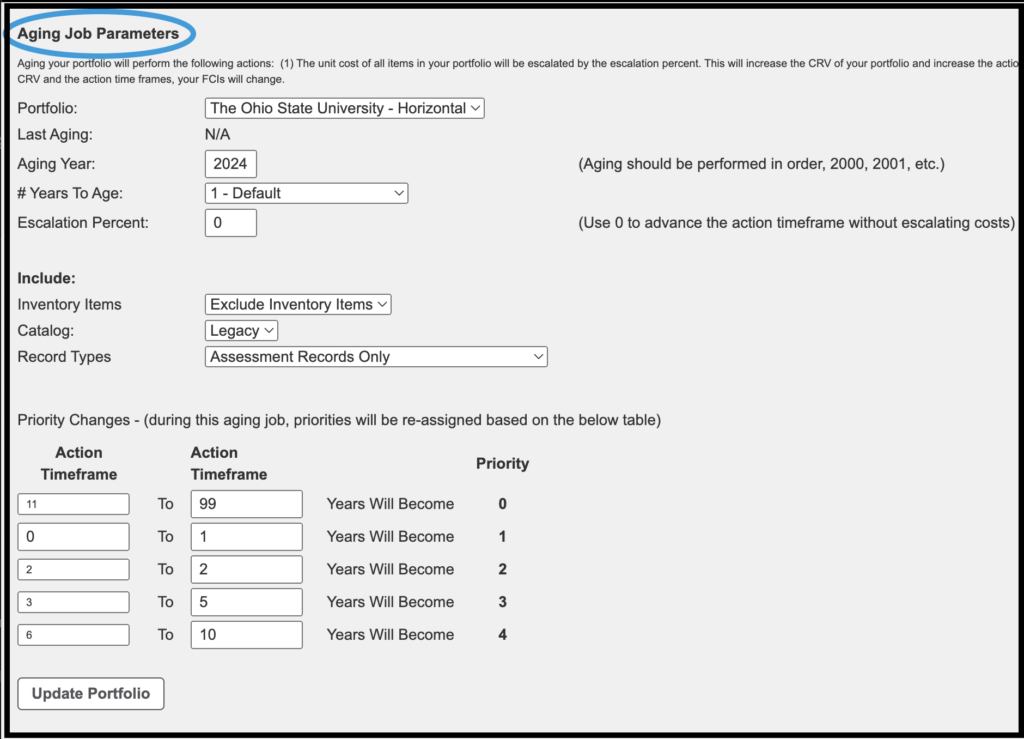
The Lifecycle Management section allows users to manage Aging Job Parameters.

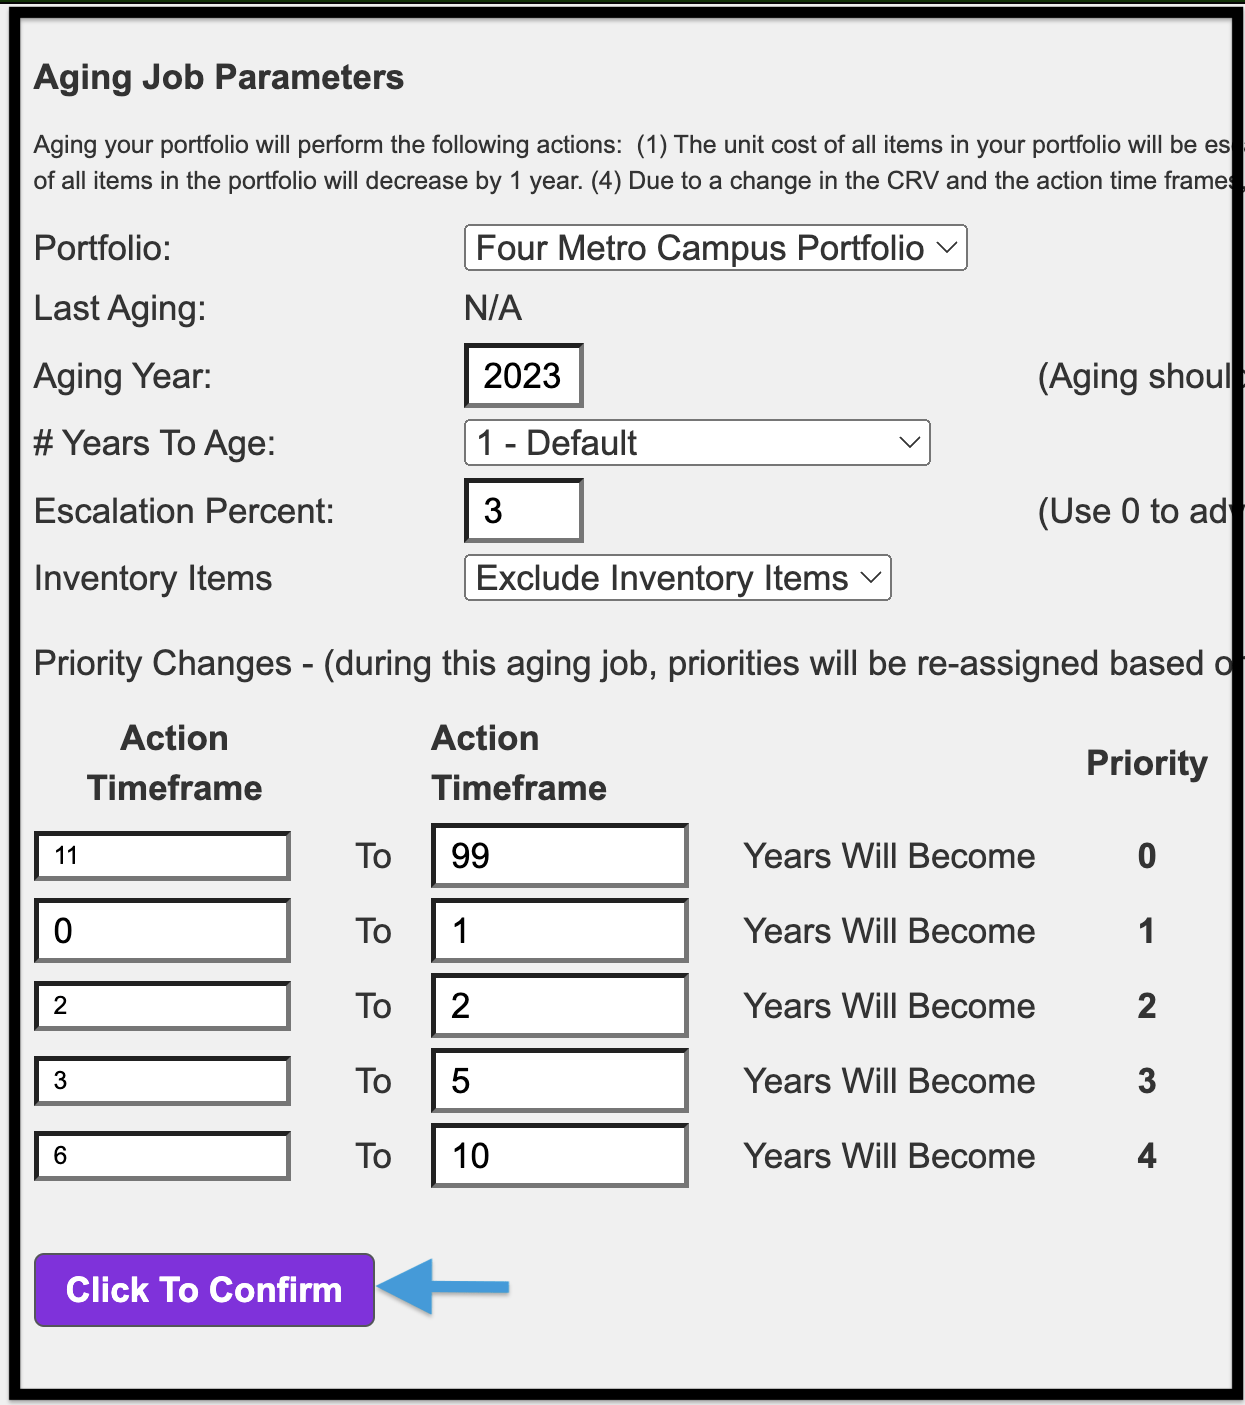
- Aging the portfolio will:
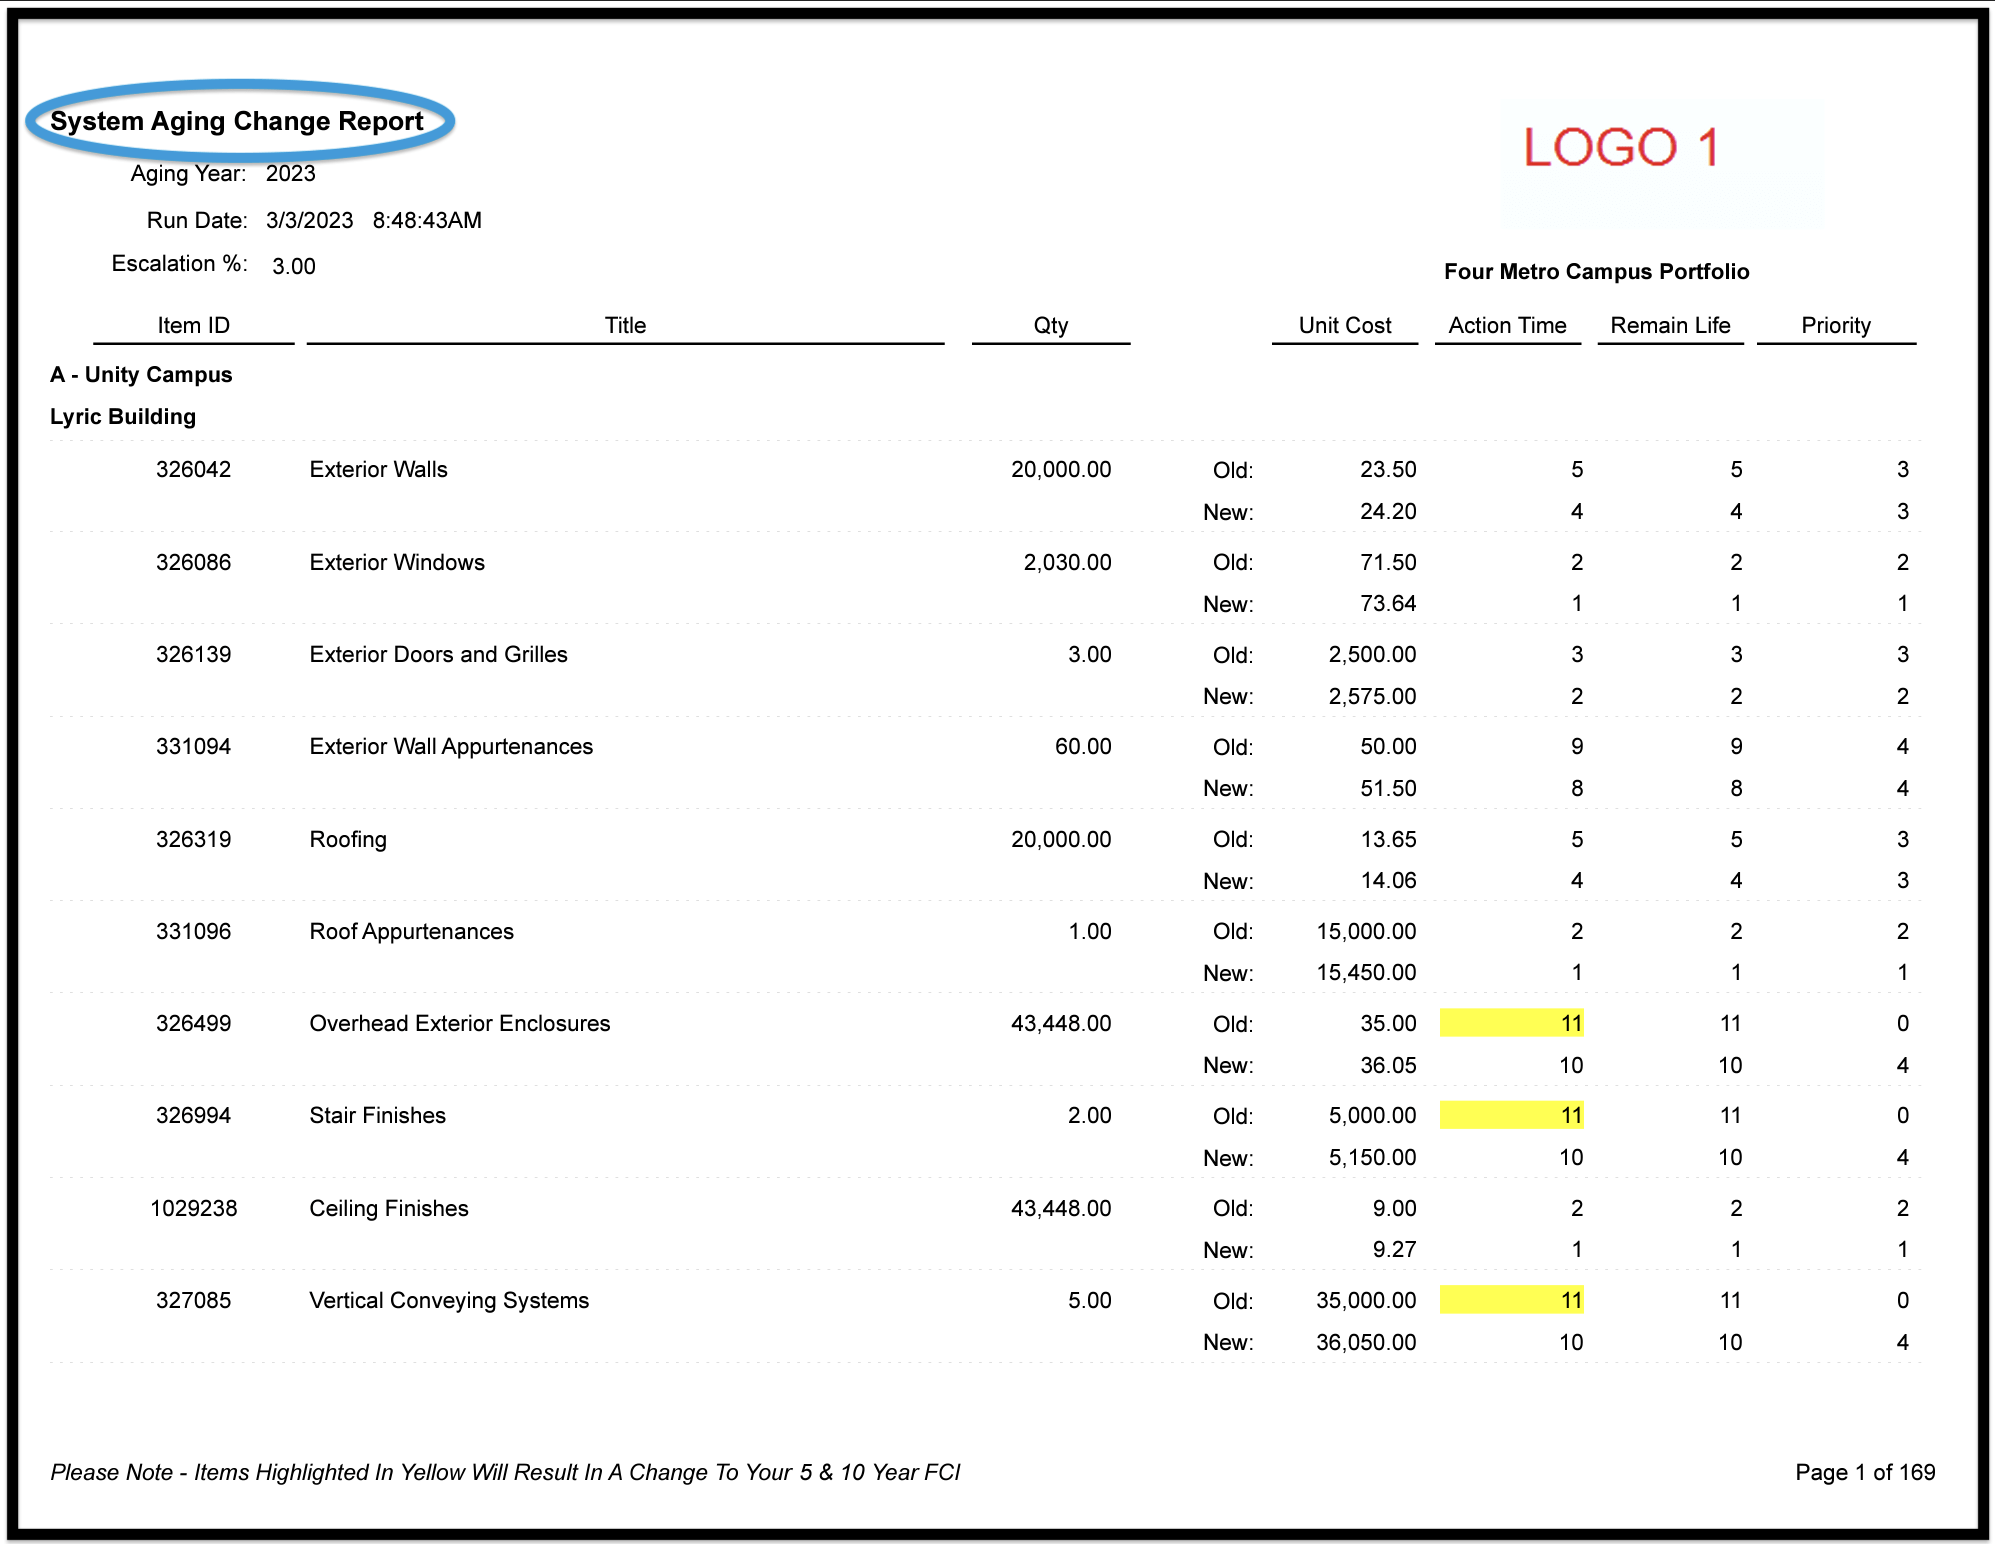
- Escalate the unit cost of all items in your portfolio by the escalation percent. This will increase the CRV of your portfolio and increase the action costs by the same percentage.
- Decrease the action timeframe of all items in the portfolio by 1 year.
- Decrease the observed remaining life of all items in the portfolio by 1 year.
- All FCIs will change due to a change in the CRV and Action Timeframes.
- Click Perform Portfolio Aging on the top left of the page.
- Begin by selecting the Portfolio you would like to age.
- Enter the year that will begin the aging report.
- The # Years to Age will default is 1. To escalate without aging, select 0 from the Years to Age dropdown menu.
- Enter the Escalation Percent to reflect the percent increase in costs.
- Inventory Items – Select Include or Exclude from the dropdown.
- Catalog – Select the Item Catalog in use, either Legacy, BOM, or in some cases, both.
- Record Types – Select Assessment Records Only, Assessment Records and Modeled Aggregates, or Modled Aggregates Only.
- Update all Action Timeframes and click Update Portfolio.
- Information within the Portfolio will be updated throughout the system as defined by your selections.


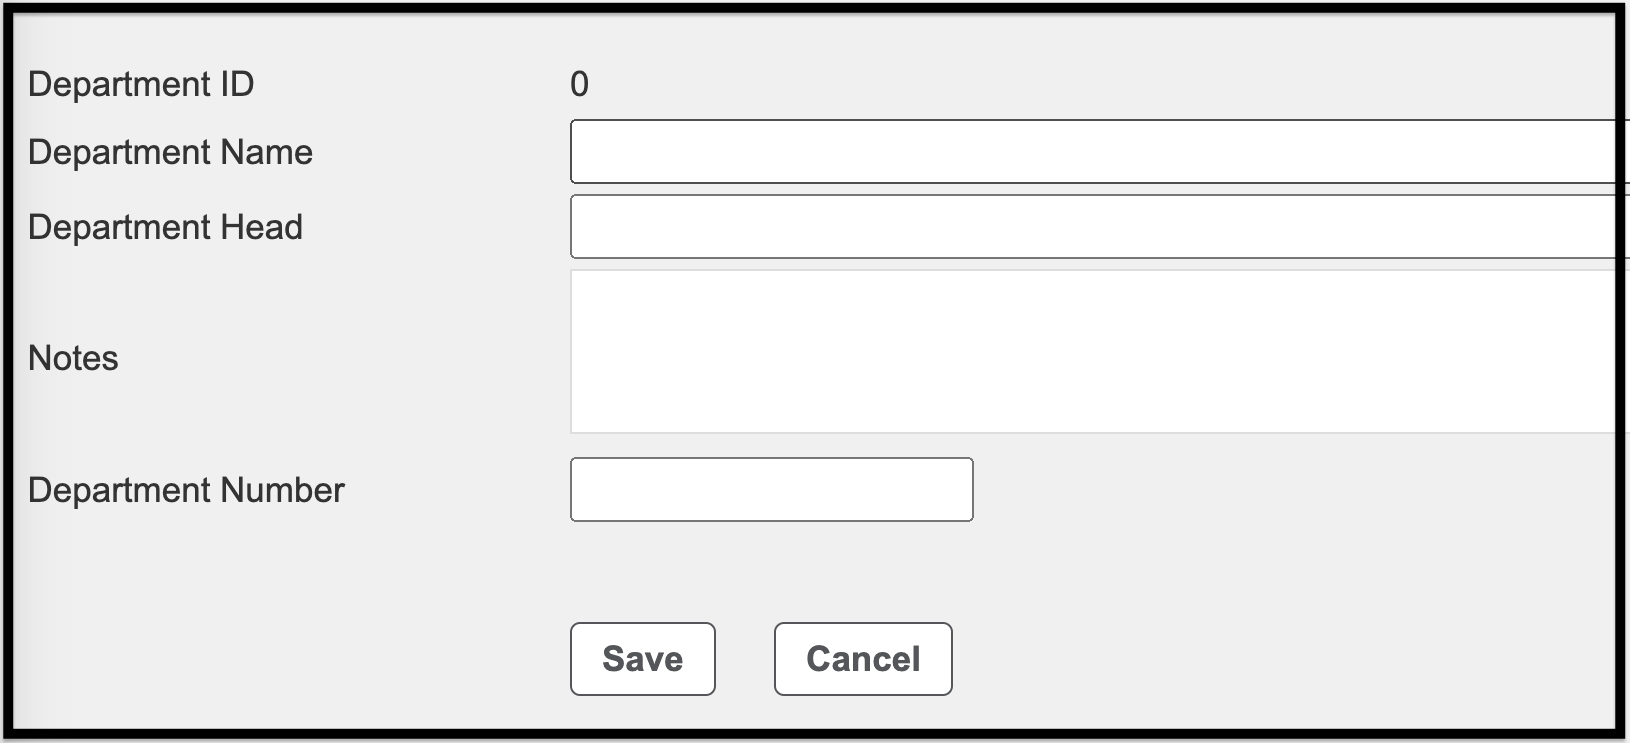
Manage Client Departments #


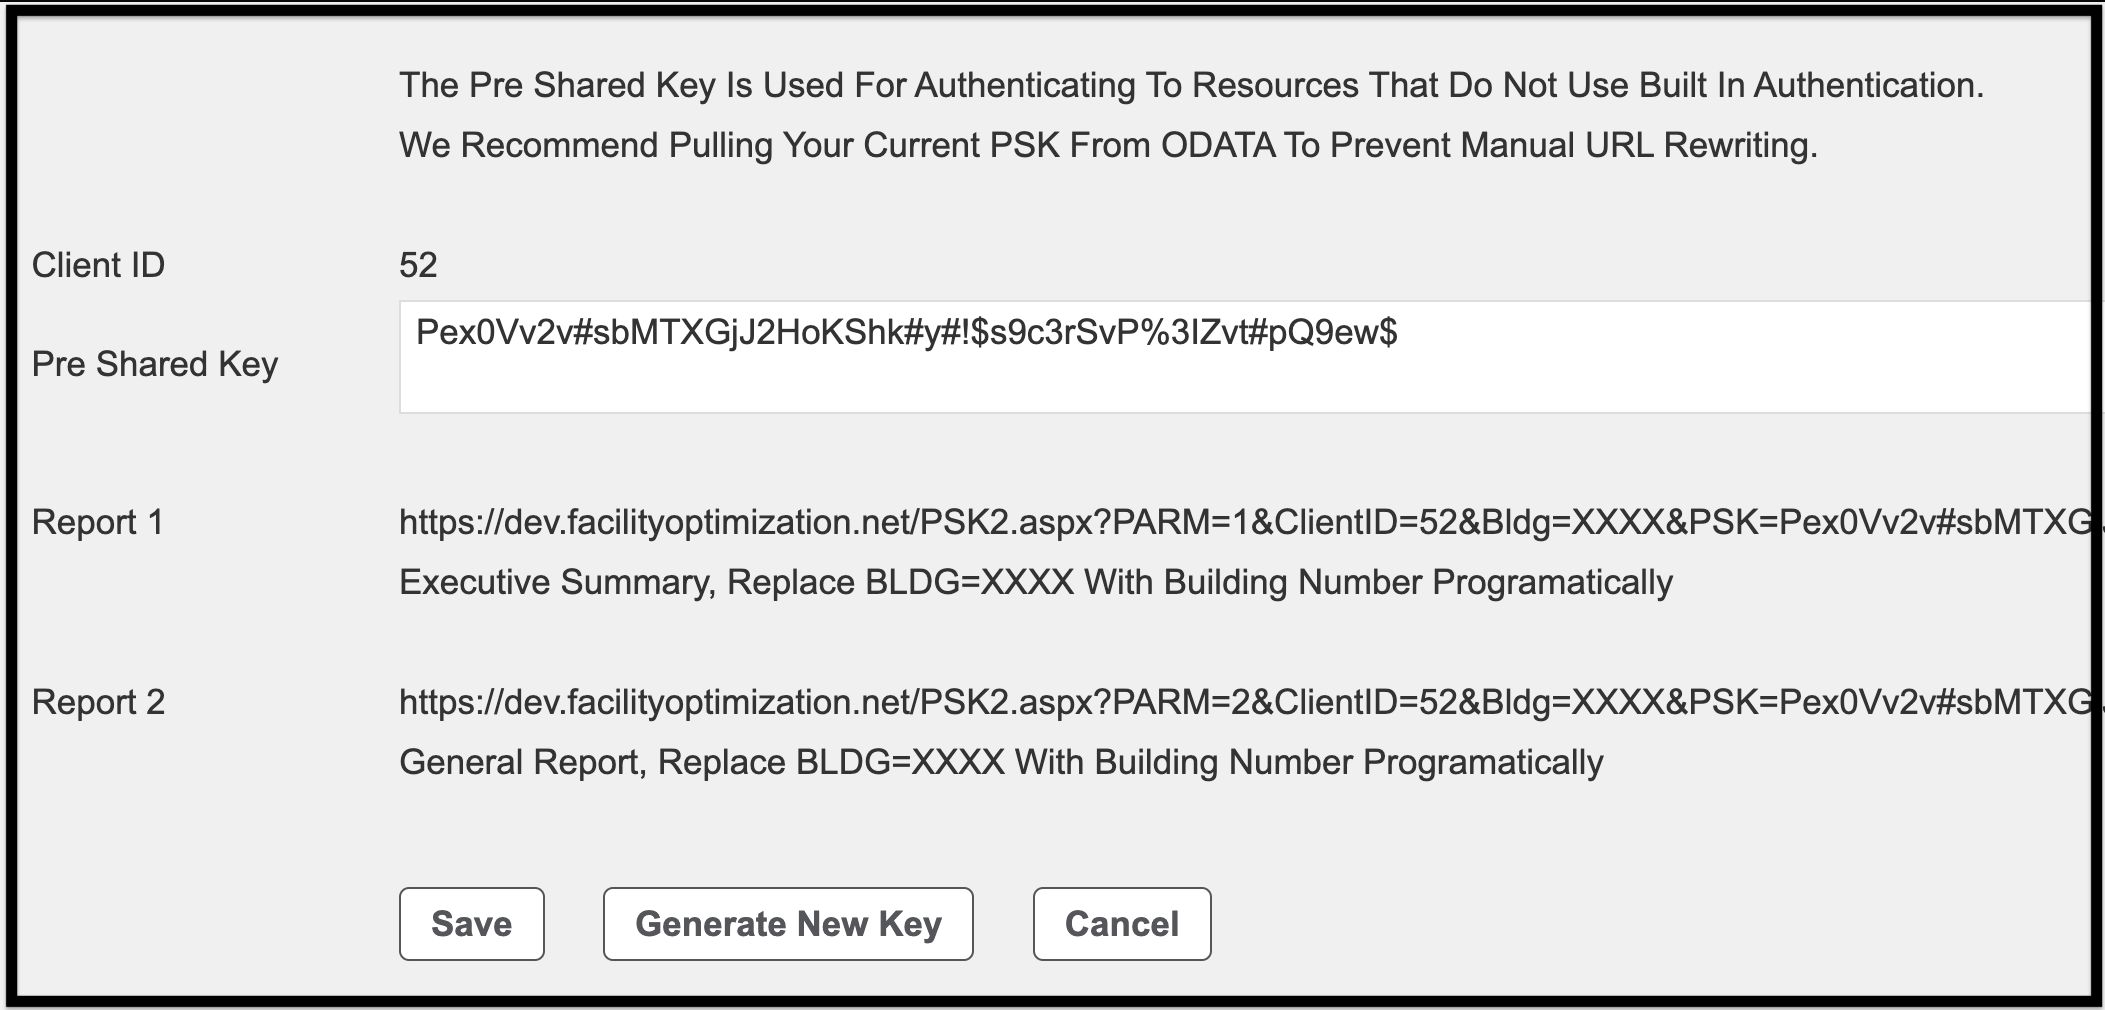
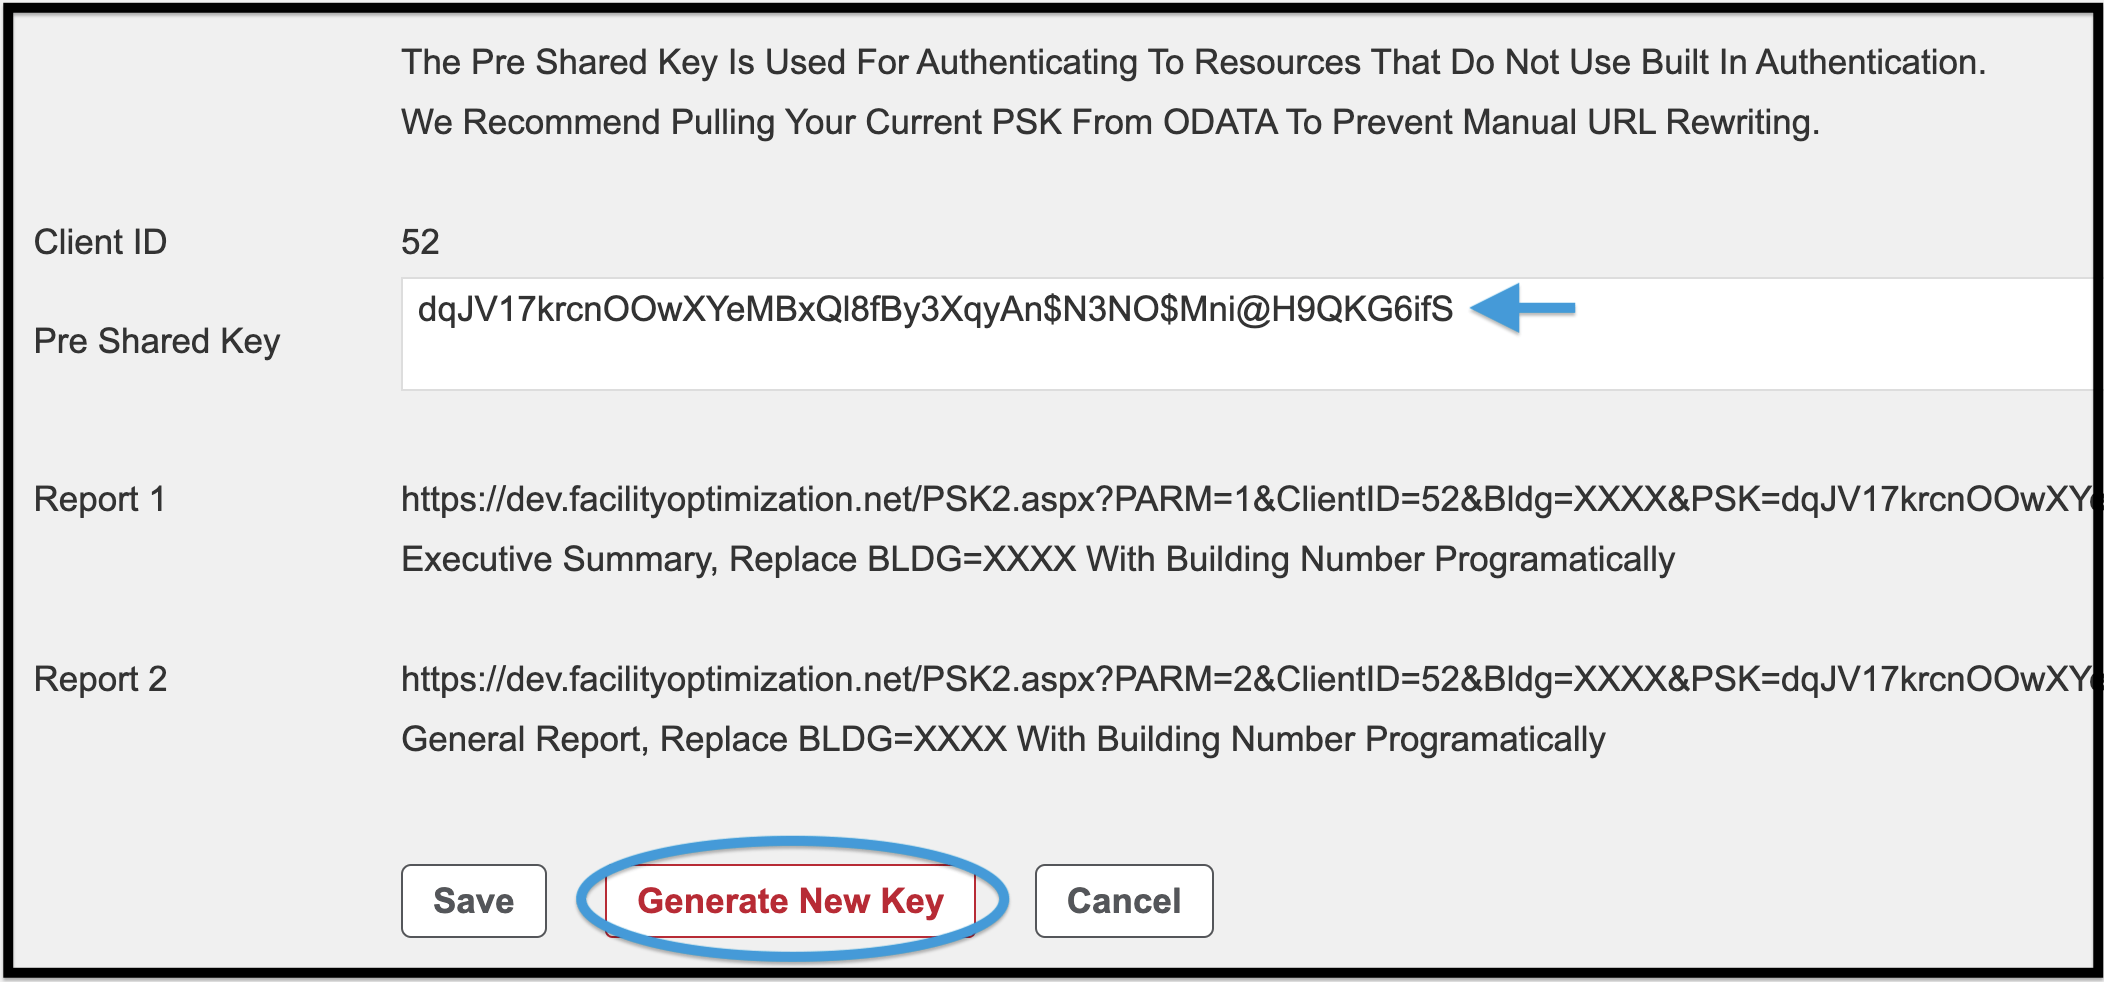
Manage Pre-Shared Key (PSK) #
TCO Mapping #
The simplified FOScore® TCO structure can be mapped to a client-specific structure that can be available in the Ad Hoc Reports feature of the Reports Module. To access the Client-Level Map located in the Admin Module, click on the TCO Mapping link beneath the Client Admin Options heading.

You can customize names to fit your own unique needs, as shown below.
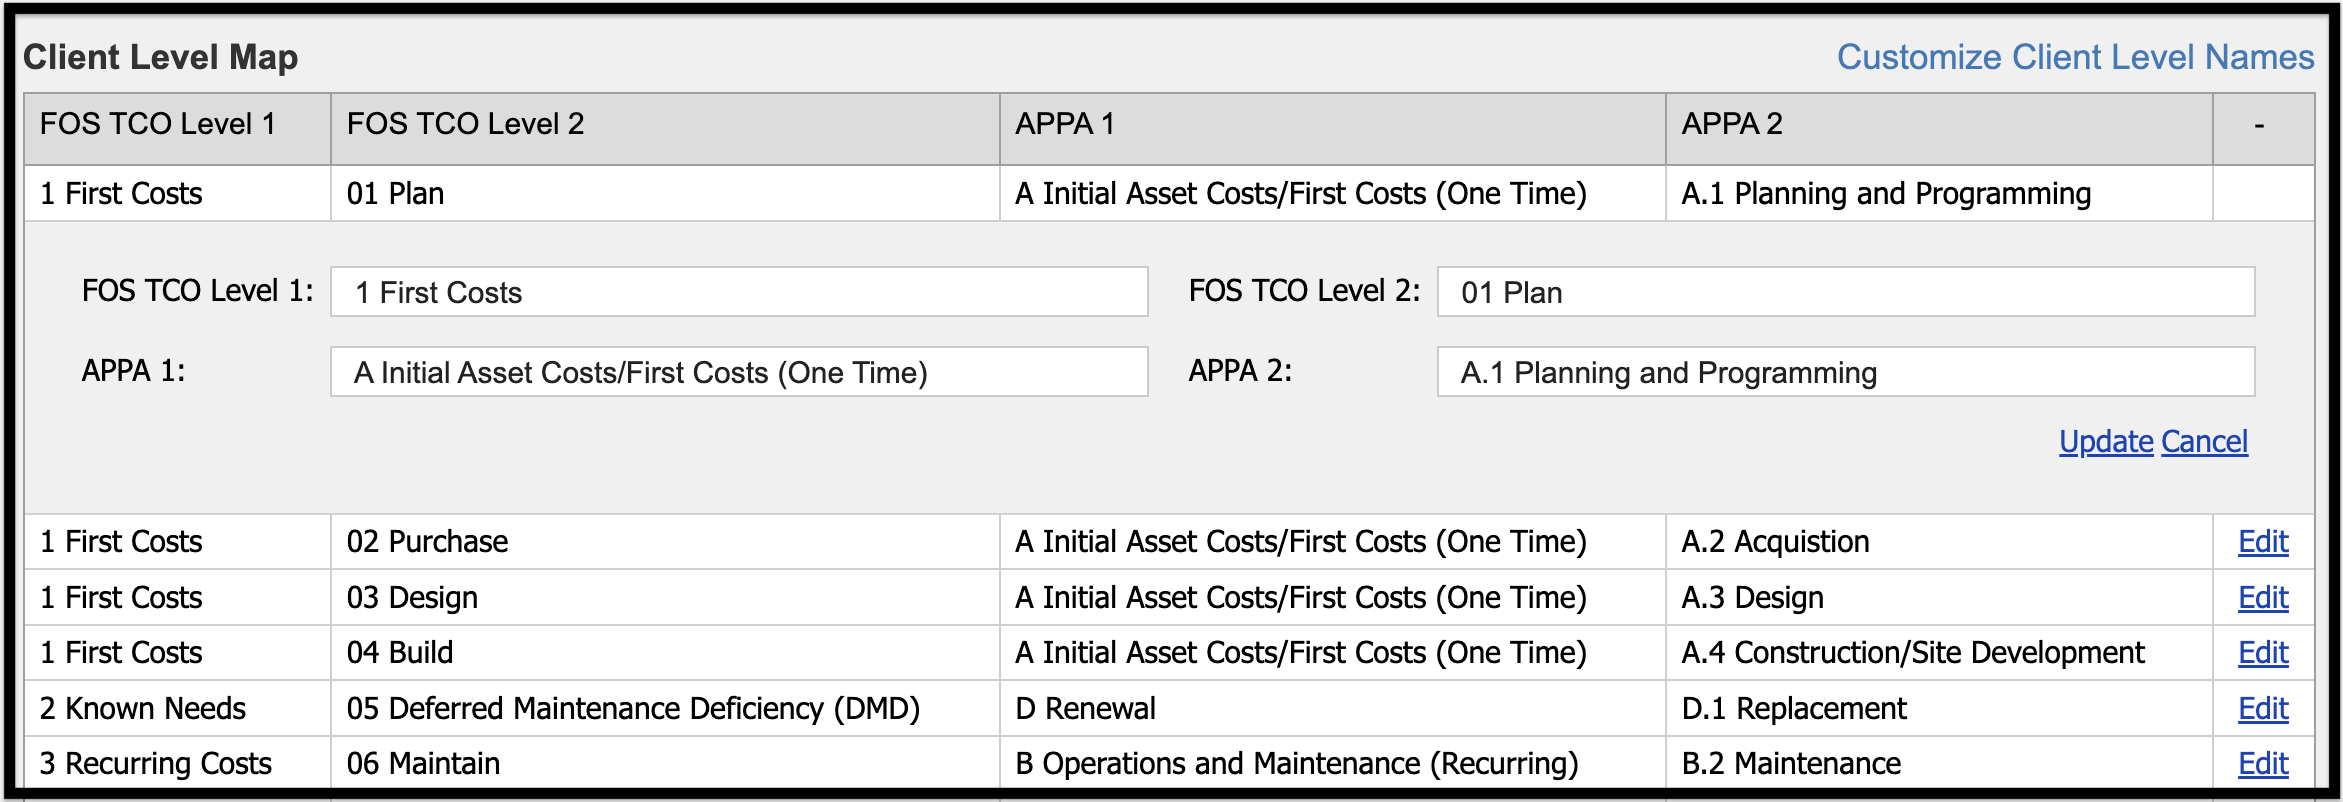
In addition, you are able to customize the labels that are used for mapping levels, as shown below.

Assessment Item Repricing #
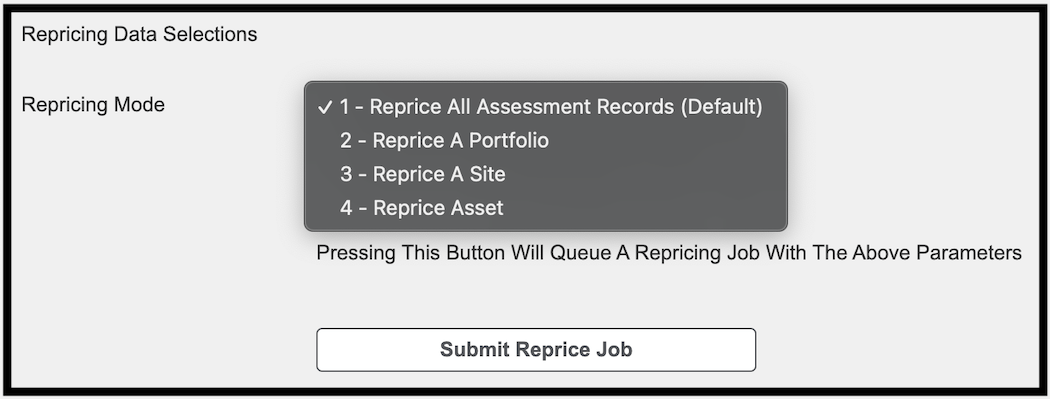
This option is available to clients who use the BOM Item Catalog. Click Submit A New Job to be taken to the repricing screen.

Using the BOM Unit Cost Methodology, assessment items can be repriced in one of four different modes, as described below.
1 – Reprice All Assessment Records (Default): This method will find all assessment items throughout the entire client that were created with the BOM Item Catalog, and reprice the unit costs based on the current state of the BOM line items and active rate table.*
2 – Reprice A Portfolio: This method will find all assessment items throughout all portfolios selected that were created with the BOM Item Catalog, and reprice the unit costs based on the current state of the BOM line items and active rate table.
3 – Reprice A Site: This method will find all assessment items throughout all sites selected that were created with the BOM Item Catalog, and reprice the unit costs based on the current state of the BOM line items and active rate table.
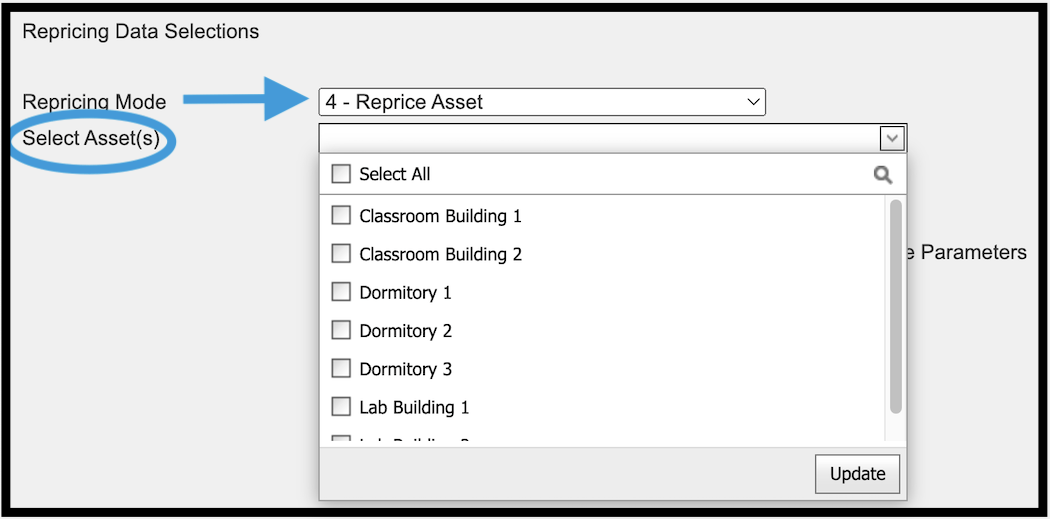
4 – Reprice An Asset: This method will find all assessment items throughout all assets selected that were created with the BOM Item Catalog, and reprice the unit costs based on the current state of the BOM line items and active rate table.
*For the most accurate up-to-date pricing the latest rate table must be assigned at the client level.

It is recommended that you save your work often. Navigating away from the page without saving your work can result in lost data.
© Copyright 2024, FOS of CannonDesign – All Rights Reserved – Confidential and Proprietary