
This site is a work in progress and will continue to change as our software evolves. Every effort will be made to publish updates promptly as they are released. Please email any questions or comments to pburgio@foscd.com.

Projects #
In This Section #
- Introduction
- Create a Project
- Update a Project
- Working with Project Documents
Introduction #
- The Projects module is used to create or update new projects inside of a JOC contract. The project defines various site and project-level information that affects all work orders that are issued against the project.
- Once a project is created the user can issue one or more work orders against the project. The work order level manages the contractor bid process against a given project and manages the Scope of Work, RFP (Request for Proposal) document creation and transmittal, NTP (Notice to Proceed) document creation and transmittal, and the management of the proposal process.
Clicking the Projects link will take you to the Projects grid which will show project balance as well as all open projects you are authorized to view. You can navigate to the individual Project by clicking the Project ID or create a new project by clicking the Create A Project link in the upper right.
The default Projects view shows all open projects. You can filter the view by entering criteria into the search bar and pressing the search button. If you wish to include closed or canceled projects in your search, uncheck the Hide Cancelled Projects checkbox.

The Projects grid has the following computed values:
- Project Reservations: the funds reserved for the project from the Project Reservation field on the data entry page.
- Project Balance: the project reservation less any work order amount issued against the project.
Create a Project #
After clicking the Create A Project link the system will prompt you to select a JOC contract to issue the project against. Select a contract by clicking the JOC# to which you would like to assign the project.

You can filter the list by entering your search criteria and clicking the search button. After selecting a JOC contract to associate the project with you will be taken to the standard data entry/update page to enter your project details.
Update a Project #
Within the Create a Project section, there are five main tabs to collect and view data.
- Project Information
- Dates/Schedule
- Work Orders (see separate Work Orders section in this guide)
- Documents
- Analysis
The first tab used to create a project, the Project Information tab, is shown below. The data entry fields are responsive and may differ slightly based on the data collection requirements of your department or organization and your role.
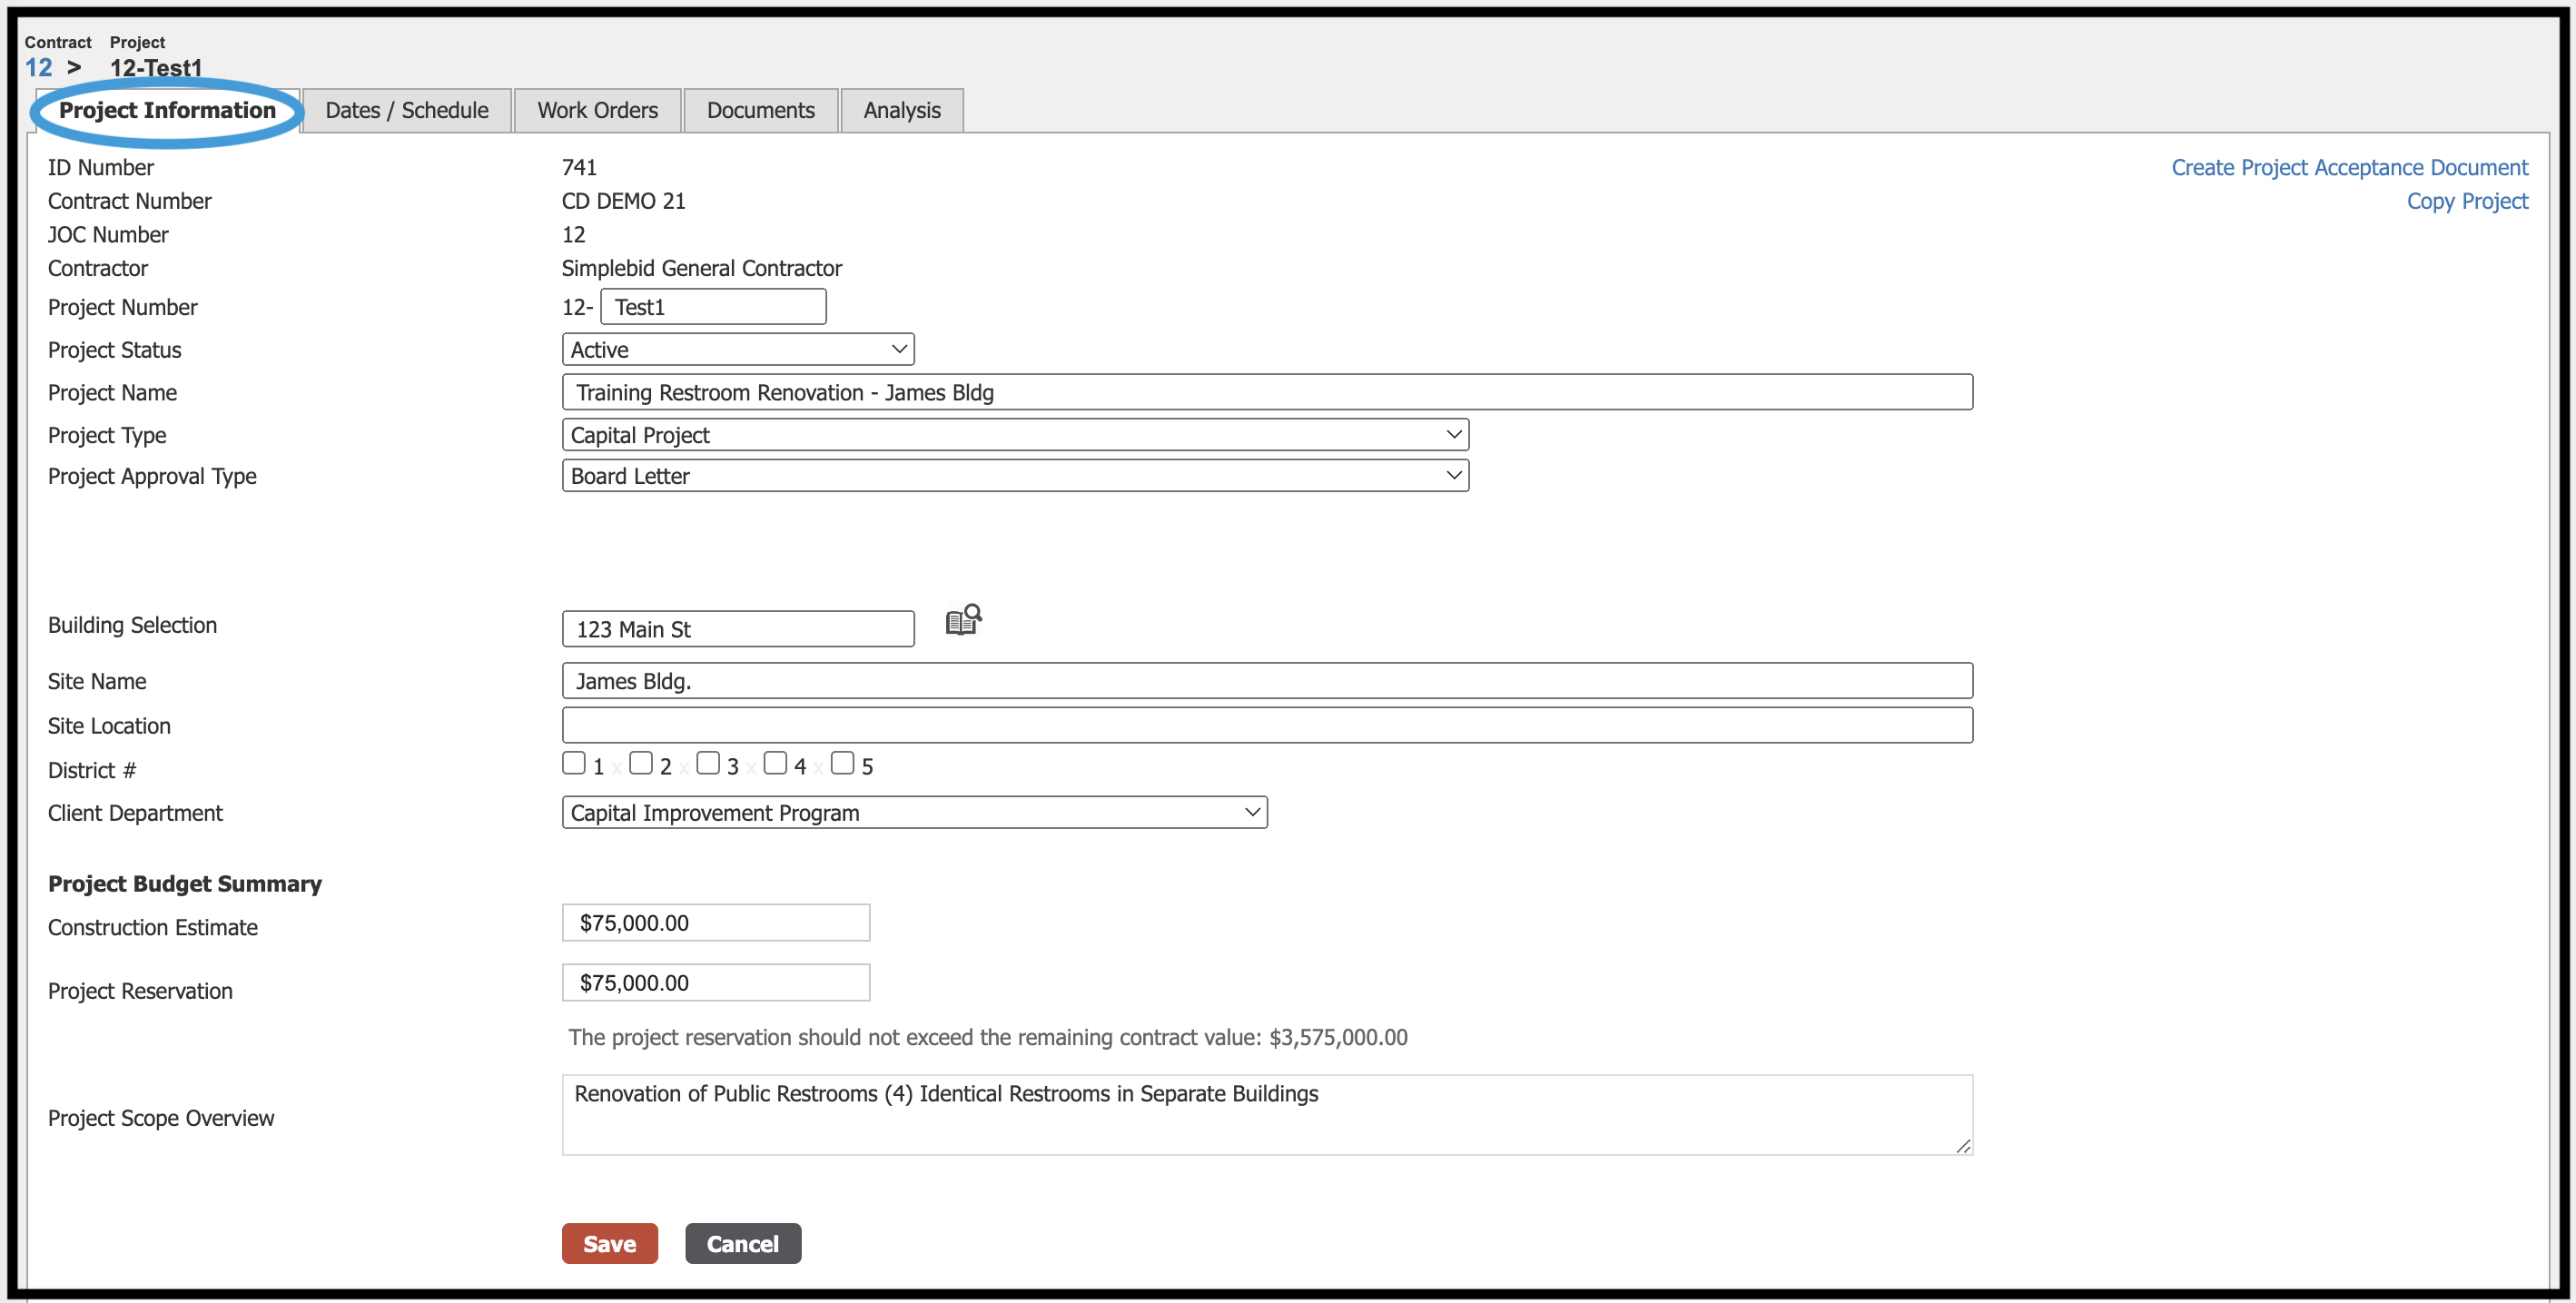
The following data entry fields are typical but may vary based on the user’s software configuration:
- Project Number
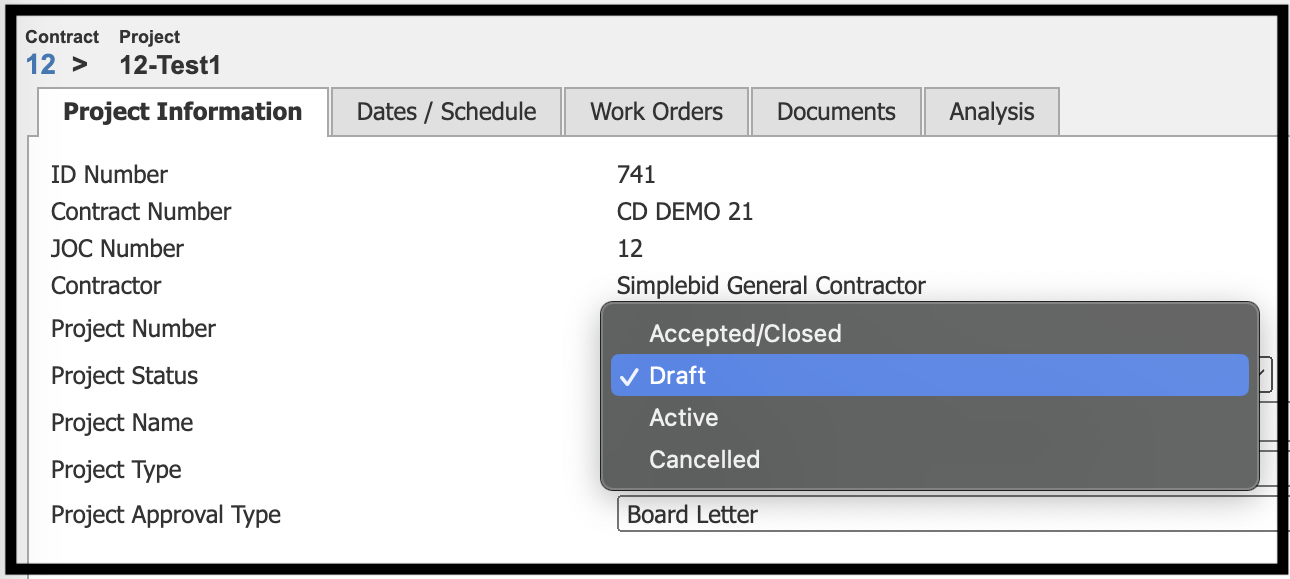
- Project Status: A dropdown menu of project status options, for example, draft, active, canceled, etc.*
- Project Name: The name of the project
- Project Type: A dropdown list of project-type options
- Project Approval Type: A dropdown list of project approval descriptions
- Building Selection: Clicking the book icon will open a table of buildings to select and autofill information. The Locations Book must be configured for the list to populate. After opening the book, a search bar is available to help find the appropriate record.
- Site Name: The name of the site where the project is located. This field will autofill if the Locations Book is used.
- Site Location: The address of the site where the project is located. This field will autofill if the Locations Book is used.
- District #
- Client Department: A dropdown list of departments within the overall organization.
- Project Budget Summary
- Construction Estimate: A cost estimate for the project may be entered into this field for reference.
- Project Reservation: This field will reserve contract capacity for the project. When contract capacity is reserved by projects, new projects may be prevented from being opened if they exceed the remaining capacity. It is recommended that an administrator be assigned to monitor contract capacities.
- Project Scope Overview
Based on your organization’s configuration and the user role assigned to you, some of these fields may not appear or additional fields may appear. Please contact your administrator or Simplebid® representative for additional support, if needed.
Building Selection #
A useful feature of the Simplebid® software is the ability for organizations to upload a location book that can be used to search for rapid data entry by the end user. If your organization has made use of this feature an icon of a book with a magnifying glass will appear next to the Building Selection field, as shown below.
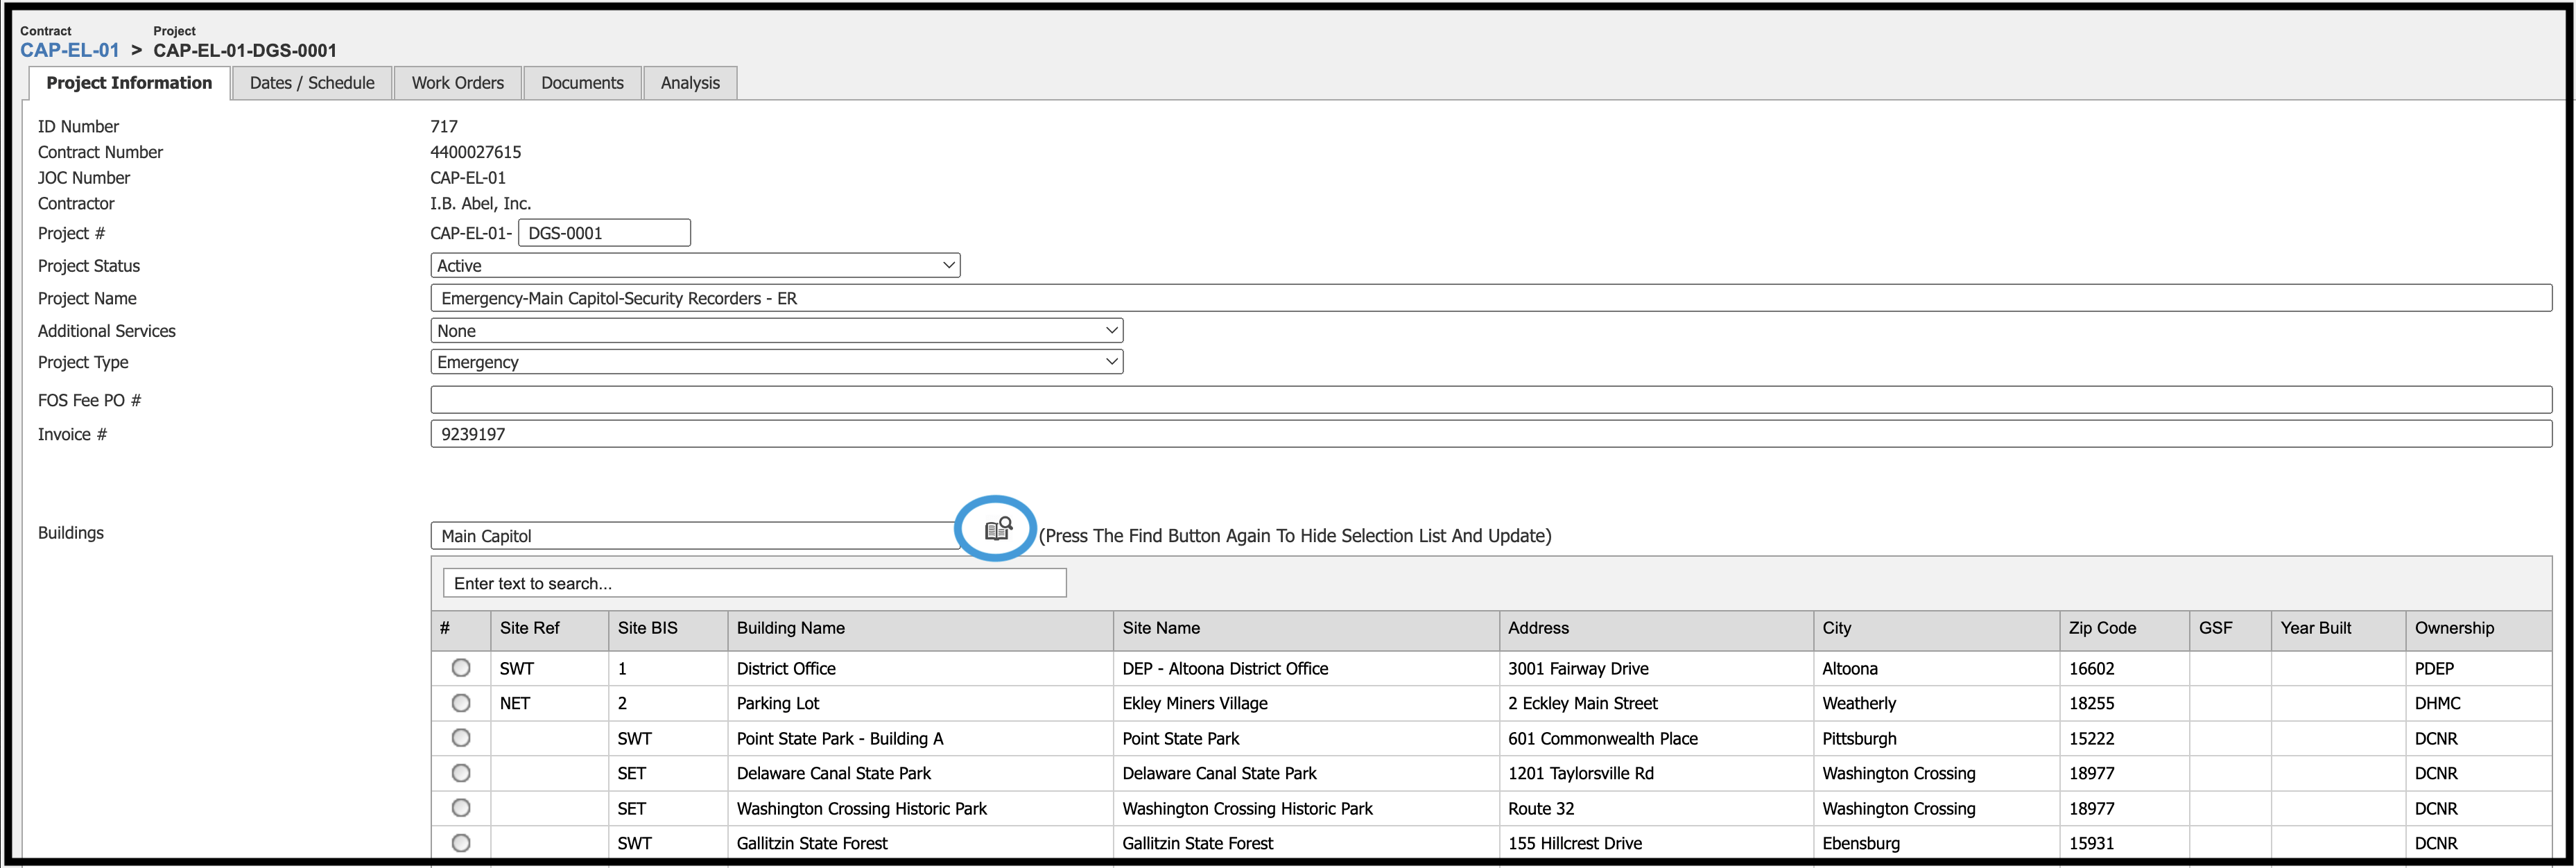
When using fields tied to the Building Selection you have the option to manually enter the requested data or click the book icon. The system will then open and display the location list, a searchable book of location data provided by your organization.
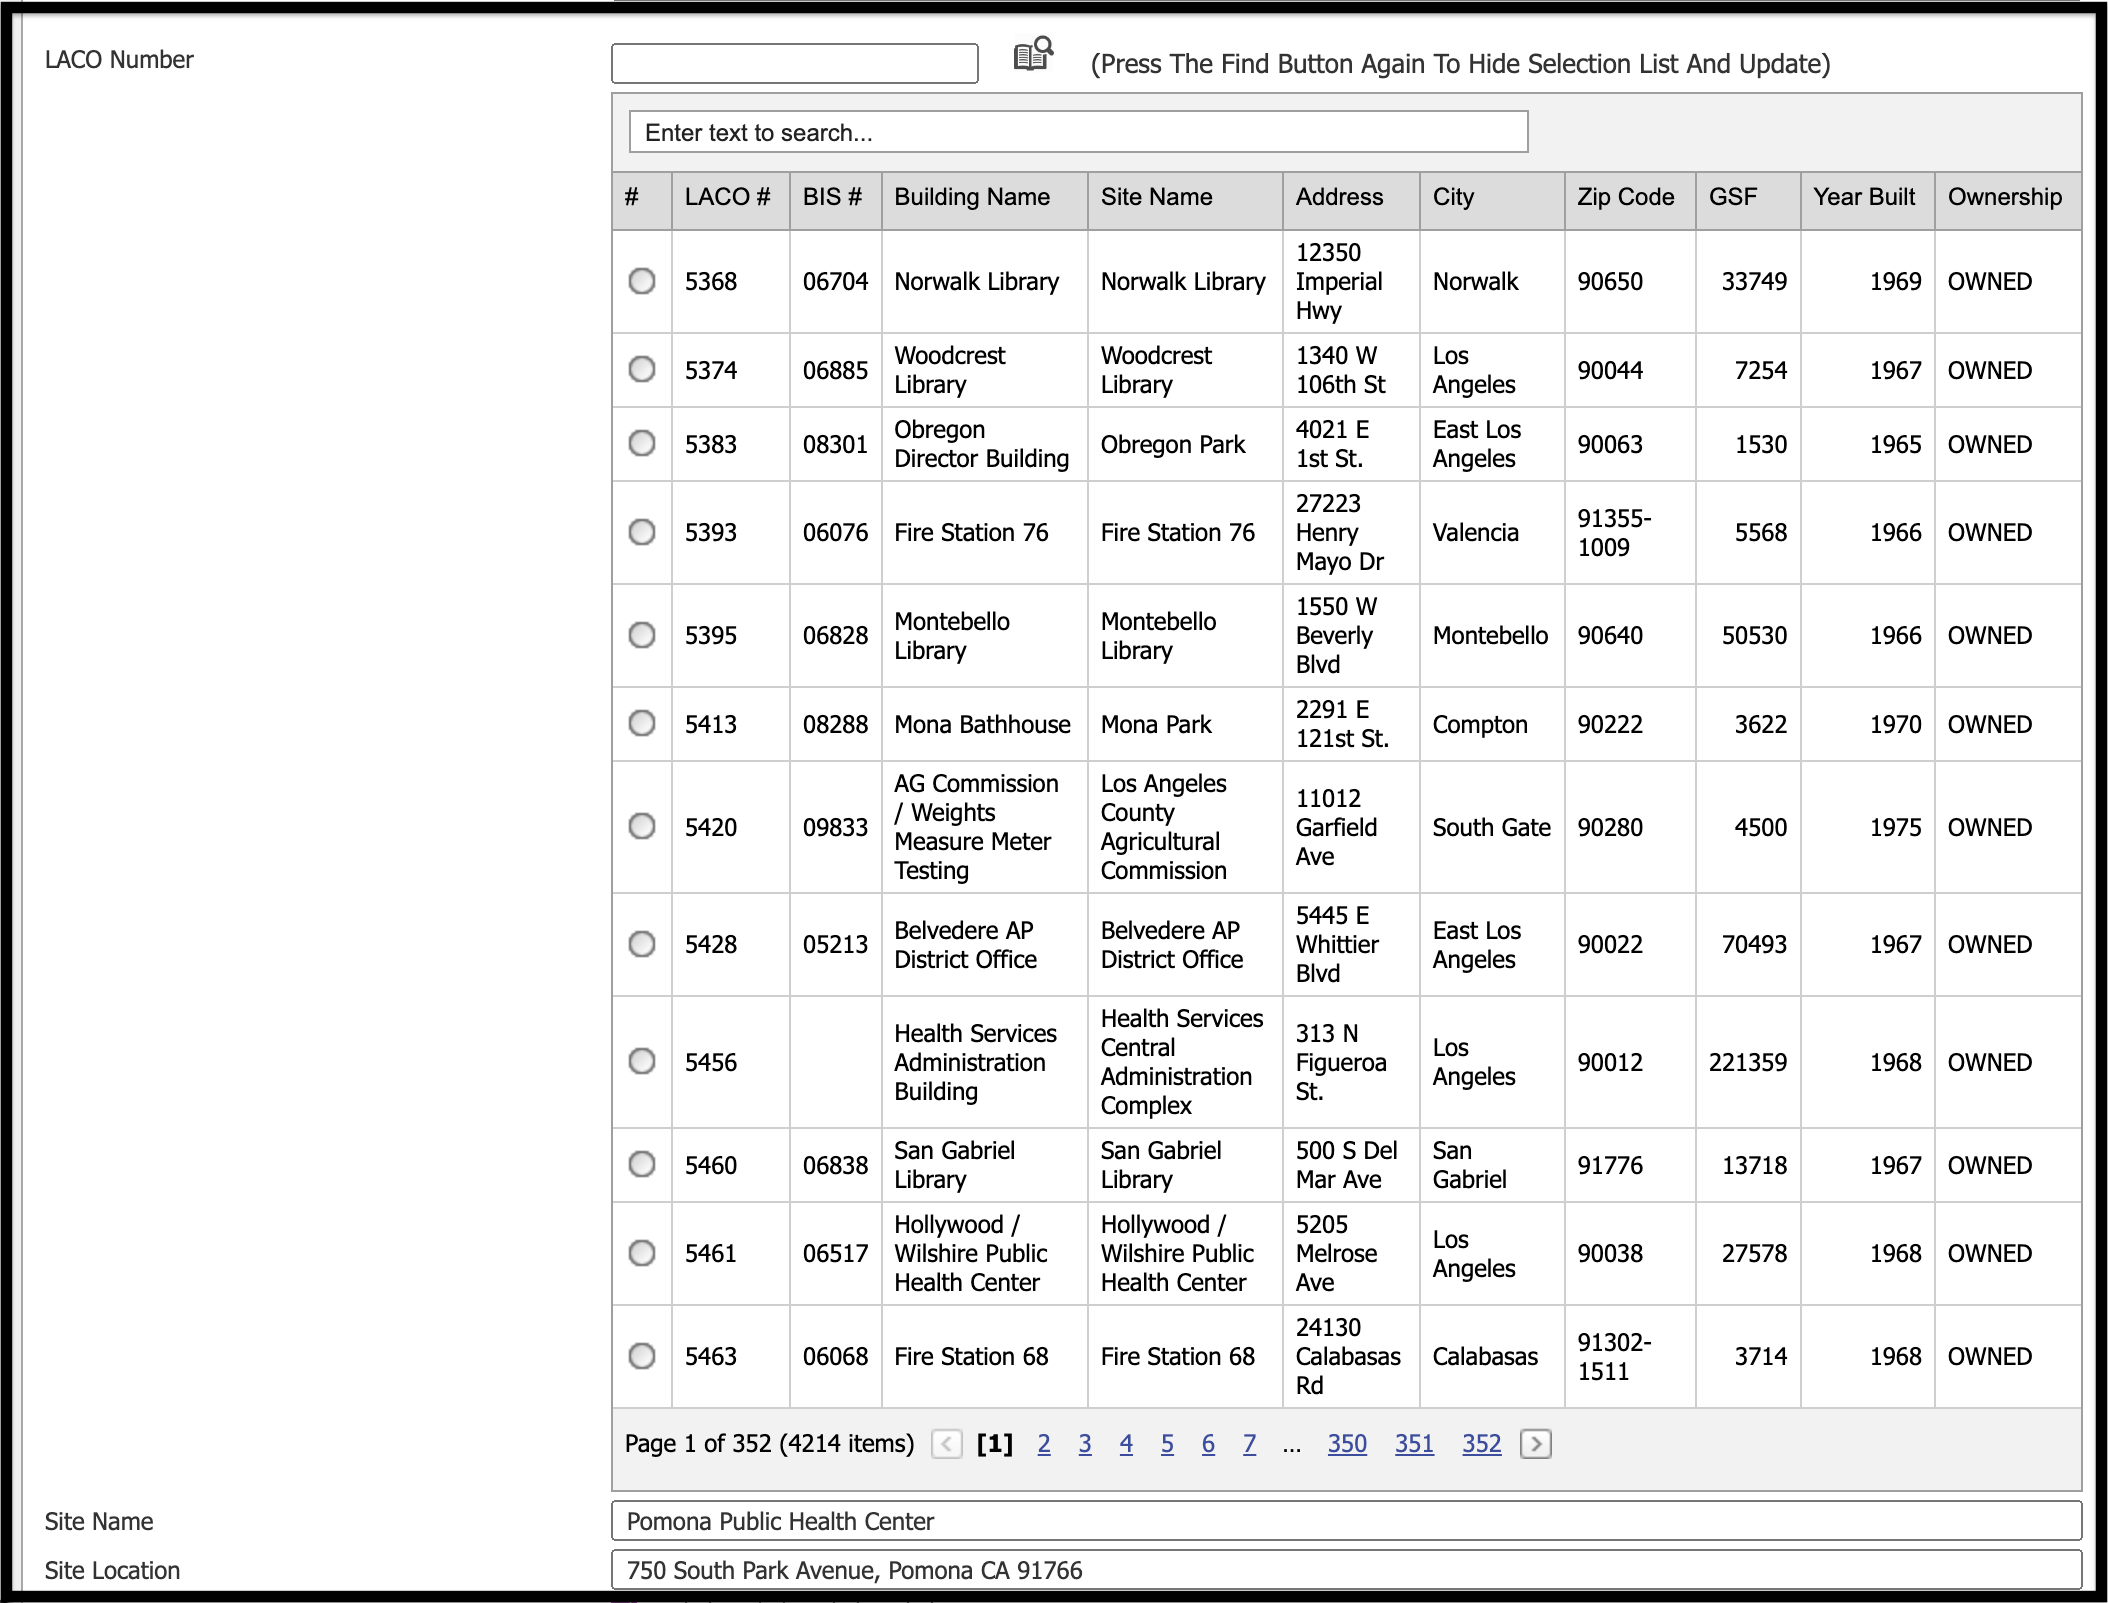
Entering search criteria will filter the book to include only your selected data. Click on the circle to select the desired location. Clicking the book icon again will update the screen with your selected data and hide the book.
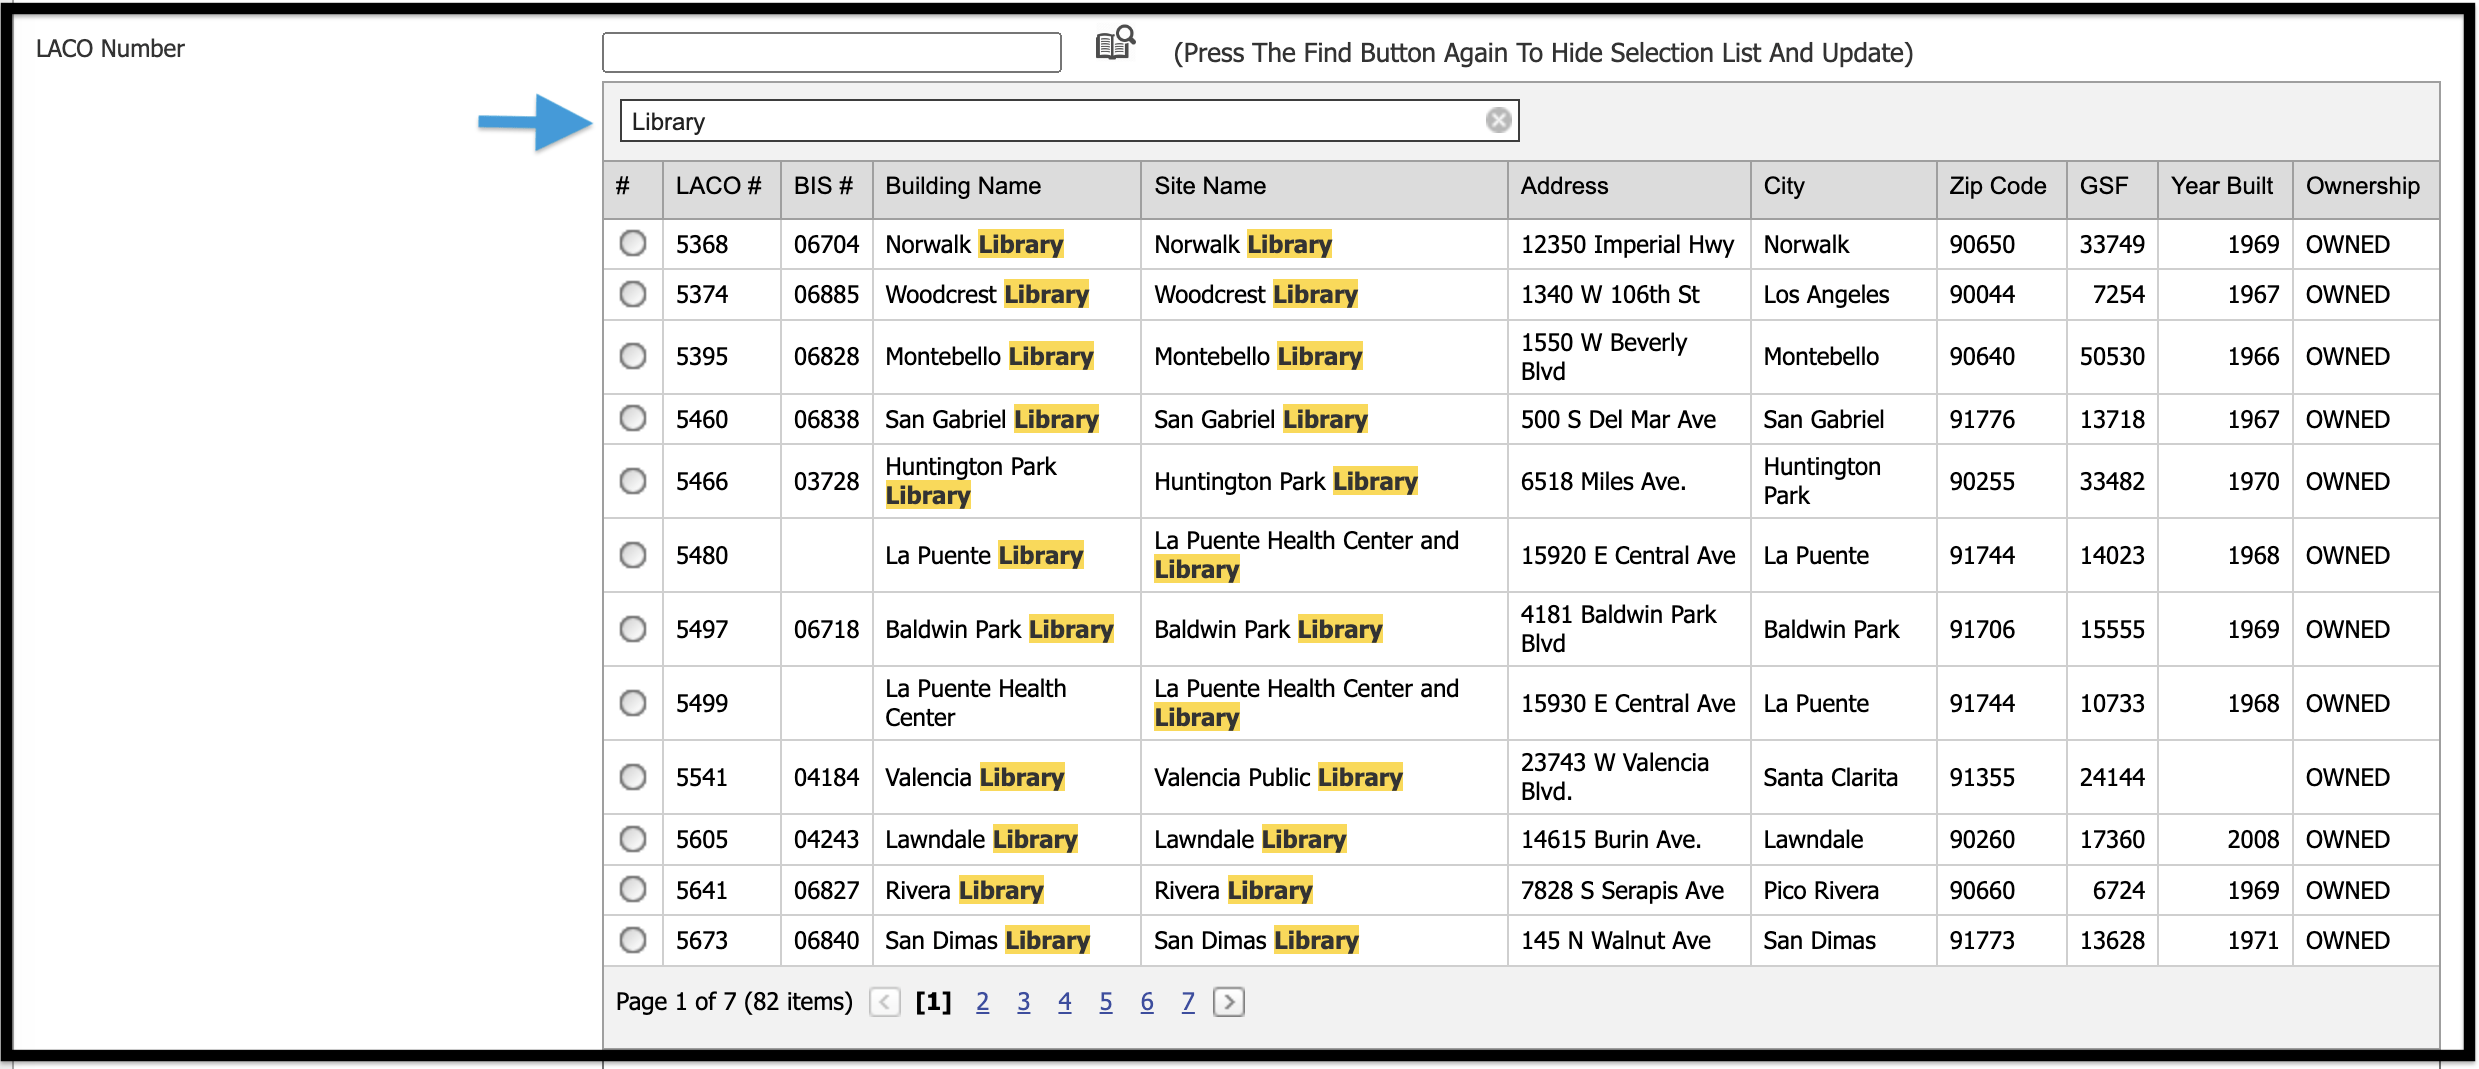

As seen in the example below, the book is now hidden and the form has been updated with data from the Building Selection.

Finally, the contract record and all your changes can be saved by clicking the Save button, if you want to leave the record and discard your changes, you can click the Cancel button to return to the Projects grid.
Dates/Schedule #
Interactive Calendars
Date fields will present an interactive calendar for your use when specifying a date. Clicking the calendar icon will cause the calendar to pop up and clicking the date on the calendar will populate the date as shown in this example:
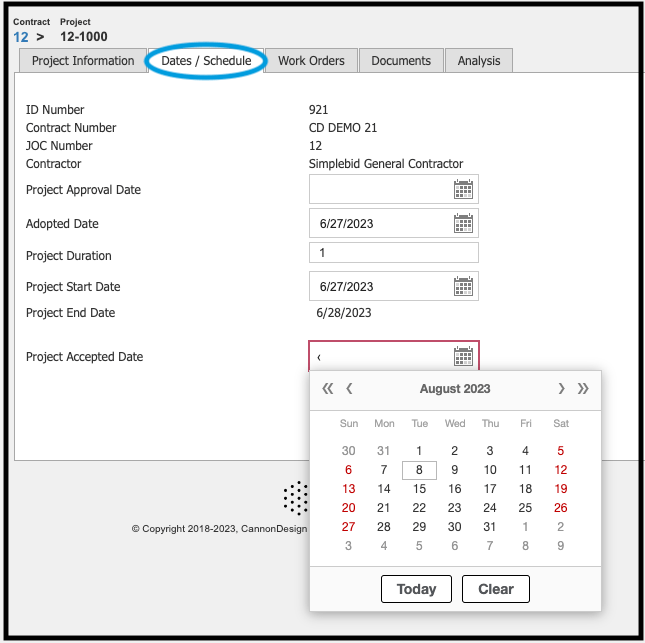
As you navigate through the Projects data entry tabs, you will reach the Work Order tab. This screen provides a summary and some on-screen calculations of the various work orders issued against the project. You can create a new work order against the project by selecting the Create Work Order link (details covered in the separate Work Orders section of this guide) or you can access an existing work order by clicking the Work Order Number link.
The system will provide a calculated summary of your various work orders and a summary of the dates and activities of the various work orders written against the project, as shown below.
Work Orders #
Individual work orders, sometimes known as task orders or job orders, must be created for the project. The work order is where detailed scopes of work are created and RFPs are sent to contractors. Multiple work orders may be created for each project to account for phases, supplemental work, changes to scope, or other situations encountered during the project.

Click on the Work Orders tab to be taken to all project-related work order information.
You can also create a new work order from this tab. The Create Work Order link is highlighted in the image above. Clicking on the link will bring you to the Work Order Information screen and related tabs that you will use to provide the necessary details to issue work orders against a project.
Refer to the Work Orders section of this guide for detailed help.
Documents #
The Documents tab is a where you would store project-related documents such as plans, drawings, specifications, and other relevant files you may need to access at a later date. Files uploaded here are available only to internal users.
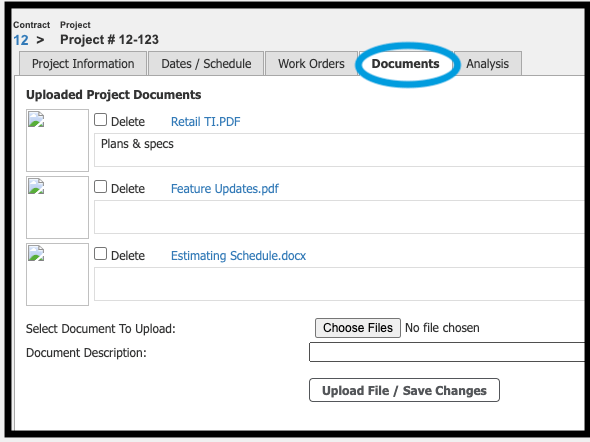
To upload a new project document, simply click the Choose File button. Your web browser will prompt you for the location of the file(s) you would like to upload. This process may vary slightly based on your operating system and web browser but it should be familiar as it uses the standard web browser prompts. After selecting a file enter a document description in the Document Description field and then choose Upload File/Save Changes to send your file to the system.
There are multiple operations available when working with project documents. The Documents tab of the data entry/ update screen provides a preview of the uploaded document, a link to open the document, a description of the document, an option to delete the document, and an opportunity to upload additional documents. The below section addresses the options available when working with project documents:
Upload New Document #
To upload a new project document, simply press the Choose Files button and your web browser will prompt you for the location of the file you would like to upload. This process may vary slightly based on your operating system and web browser but it should be familiar as it uses the standard web browser prompts. After selecting a file enter a description in the Document Description field and then choose Upload File/Save Changes to send your file to the system.
Document Description #
To change the document description, edit the description of the document directly in the text area where the description is displayed (see the first document in the above example).
You can update the description of as many documents as you like before saving. Once your work is complete, click the Save Changes button at the bottom of the screen to complete the save process.
View Document #
To view the document in a new window, click the blue link above the document description.
Your web browser will open a new window with the document displayed or download the document to a file on your computer depending on your browser settings. Please note you must have the appropriate document viewer installed on your computer (Adobe Reader, etc.) depending on the document type.
Delete Project Document(s) #
To delete one or more project documents, click in the Delete checkbox next to one or more documents you would like to delete. Once your selections are complete simply save the project by clicking the Save Changes button at the bottom of the screen and your documents will be removed during the save operation.
Analysis #
The Analysis tab provides a visual summary of the project showing the total dollar consumption measured against the current proposal, work orders, and the project reservation.


Depending on your subscription agreement and access level, documentation may be shown for areas that are not included in your menu bar. Simplebid is highly customizable to meet our clients’ individual needs; as such, some of the terminology in this guide might be slightly different than what your organization uses.
© Copyright 2024, FOS of CannonDesign – All Rights Reserved – Confidential and Proprietary